
Introduction to Handmade Sub Rolls
When you’re a young professional juggling a busy work schedule and social commitments, meal prep can feel like a daunting task. Enter handmade sub rolls—not only do they elevate your sandwich game, but they also empower you to create delicious, customized meals that align with your tastes.
So, what makes these rolls a game changer? For starters, the aroma of freshly baked bread is undeniably comforting and satisfying. Baking your own sub rolls means you're taking control of the ingredients and can even make them healthier than store-bought options. The process is surprisingly simple and can be done in about an hour, giving you a break from the daily grind.
Imagine coming home after a long day, and you have homemade sub rolls waiting for you. You can stuff them with fresh veggies, turkey bacon, chicken ham, or even beef—whatever floats your boat! Not only do they make meal preparation easier, but these rolls are also a no-fuss way to impress friends at dinner gatherings.
Plus, there's something special about handmade sub rolls. They say you eat with your eyes first, and these rolls look as good as they taste—making every meal feel like a special occasion. Ready to get baking?

Ingredients for Handmade Sub Rolls
Creating your own handmade sub rolls at home is not just satisfying; it's also quite simple! These rolls are perfect for sandwiches—think juicy turkey bacon or chicken ham. Here’s what you’ll need to make about six delicious rolls:
- 1 cup whole milk: Rich and creamy, it helps your rolls stay soft.
- 2 eggs (beaten): These add richness and moisture to the dough.
- 2 ½ tablespoons granulated sugar: Just a touch of sweetness to balance the flavors.
- 2 teaspoons active dry yeast: The magic ingredient for that fluffy texture!
- 3 cups bread flour: This gives your rolls a sturdy but tender structure.
- 2 teaspoons fine sea salt: Essential for flavor; don’t skip this!
- 3 tablespoons unsalted butter (cold, cubed): For a rich taste and flaky texture.
- 1 tablespoon water (for egg wash): It helps achieve that gorgeous golden finish in the oven.
So, gather these simple ingredients, and let’s bake some homemade goodness! If you're wondering about alternatives or tips for working with these basics, check out this helpful guide on bread baking for more insights.
Preparing Handmade Sub Rolls
Creating handmade sub rolls is an enjoyable process that fills your kitchen with warmth and delicious aromas. Let’s break down the preparation steps to make sure your rolls are perfect every time.
Bloom the yeast mixture
Start by awakening your yeast! In a bowl, combine 1 cup of warm whole milk, 2 ½ tablespoons of granulated sugar, and 2 teaspoons of active dry yeast. The milk should be warm but not boiling – think of the gentle warmth you would use for a baby bottle. Let this sit for 5-10 minutes until it foams up a bit, indicating the yeast is alive and ready to help your rolls rise. If you want to read more about the science of yeast, check out King Arthur Baking.
Combine dry ingredients with the yeast mixture
In another bowl, mix 3 cups of bread flour and 2 teaspoons of fine sea salt. This is where you’ll combine both your dry ingredients and the bloomed yeast mixture. Pour the yeast mixture and 2 beaten eggs into the flour mixture, then stir until it forms a shaggy dough. This is the first step to bringing your handmade sub rolls to life!
Knead the dough
Once your dough begins to form, it’s time to knead! Transfer it to a lightly floured surface, or use your stand mixer with a dough hook attachment. Knead for about 8-10 minutes until the dough is smooth and elastic. Don't be afraid to get your hands a little messy; it’s part of the fun!
Let the dough rise
After kneading, shape your dough into a ball and place it in a lightly greased mixing bowl. Cover it with a damp cloth and let it rise in a warm place for about 1 hour or until it doubles in size. This is often the most exciting part as you watch your dough grow like magic.
Shape and divide the dough
Once your dough has risen sufficiently, punch it down gently to release the air. Divide the dough into six equal pieces, shaping each piece into a ball. Then, flatten them gently, and roll them into long rectangles. This is essential for achieving that perfect sub roll shape we all love.
Second rise and preheat the oven
Place your shaped rolls seam-side down on a parchment-lined baking sheet. Cover them again with a cloth and let them rise for 30 minutes while preheating your oven to 400°F. This second rise is crucial for that soft, airy texture.
Egg wash and scoring before baking
Before baking, you’ll want a beautiful glossy finish. Mix 1 tablespoon of water with an egg and brush this mixture over the top of each roll. To finish, score the tops of the rolls lightly with a sharp knife. This allows steam to escape while baking, resulting in a beautiful crust.
Once your handmade sub rolls are ready, it’s time to pop them in the oven and let the incredible aroma fill your kitchen. Enjoy them fresh out of the oven with your favorite fillings!
Variations on Handmade Sub Rolls
Whole Wheat Sub Rolls
For a healthier twist, consider making whole wheat sub rolls. Simply swap half or all of the bread flour with whole wheat flour. This change not only adds a nutty flavor but also enhances the nutritional profile, giving you more fiber and essential nutrients. Whole grains can aid digestion and help you feel fuller longer—perfect for those busy workdays when you need an energy boost.
Gluten-Free Options
If you’re aiming for gluten-free handmade sub rolls, the good news is that it's easily attainable! Look for a high-quality gluten-free flour blend that includes xanthan gum, which will help mimic the texture of traditional rolls. This way, you can enjoy a soft and tender roll without the gluten—perfect for everyone in the family!
Herb-Infused Sub Rolls
For a touch of gourmet flair, why not try herb-infused sub rolls? Add fresh or dried herbs like rosemary, thyme, or oregano into your dough before mixing, and experience how these flavors elevate your sandwich creations. Imagine a turkey bacon sandwich on a roll bursting with fragrant herbs—simply irresistible!
These variations not only spice up your handmade sub rolls but also allow you to cater to specific dietary preferences or cravings. Explore these ideas and make every sandwich an exciting culinary adventure!
Cooking Tips and Notes for Handmade Sub Rolls
Ensuring Perfect Texture
To achieve that deliciously soft and chewy texture in your handmade sub rolls, be sure to measure your ingredients accurately. Use a kitchen scale for precise measurements, especially when it comes to flour. Knead the dough until it’s smooth and elastic—this helps develop the gluten which gives the rolls their structure. If you want that golden-brown crust, don’t skip the egg wash before baking. It makes all the difference!
Storing Leftover Rolls
If you happen to have any leftover rolls—though I doubt that’s likely!—let them cool completely before storing. Wrap them in plastic wrap or place them in an airtight container to keep them fresh. For longer storage, these handmade sub rolls freeze beautifully; just be sure to slice them beforehand for easy use later. Reheat in the oven or microwave for a quick fix!

Serving suggestions for Handmade Sub Rolls
Ideal fillings for sub rolls
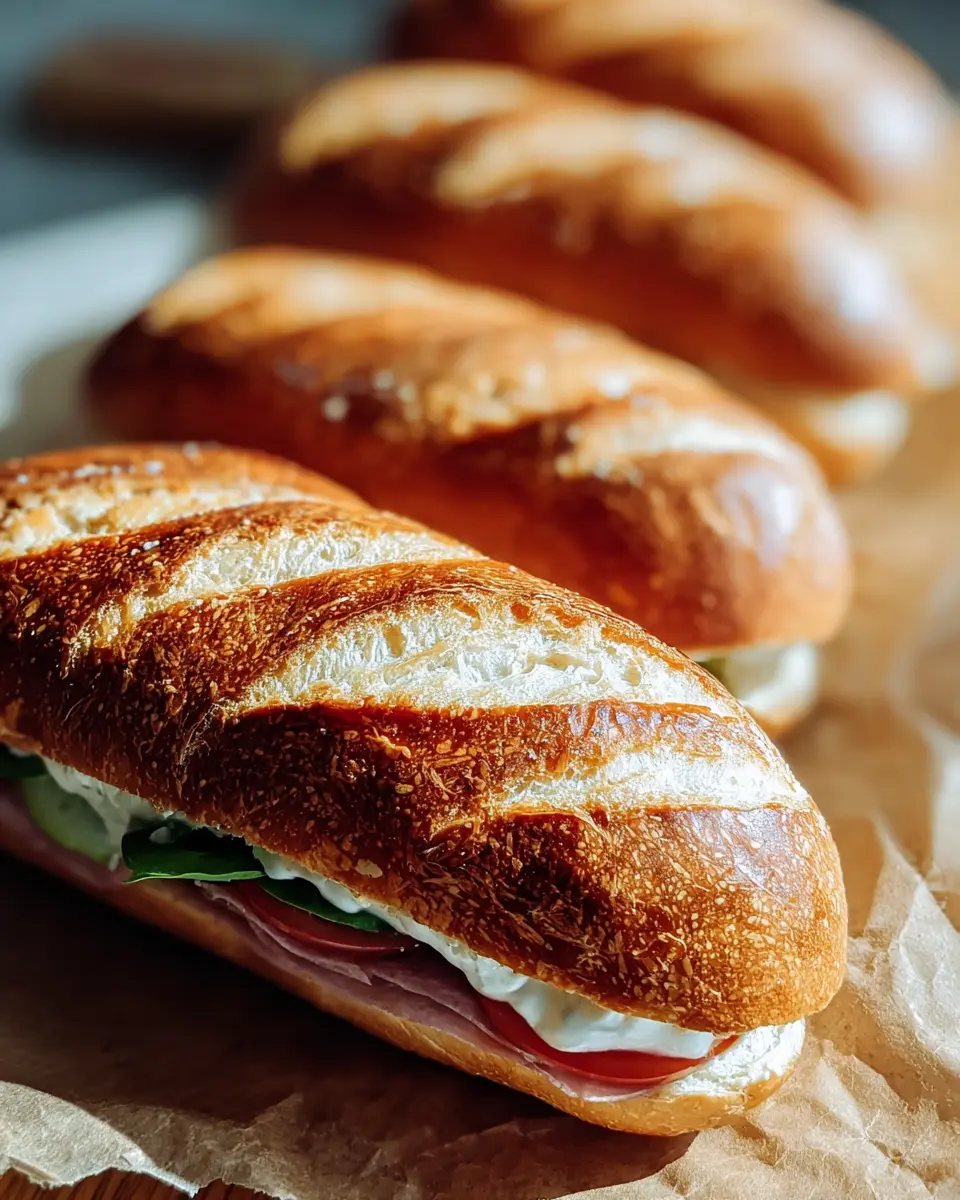
When crafting your handmade sub rolls, the fillings you choose can elevate your meal from good to unforgettable! Try delicious combinations like:
- Turkey bacon, avocado, and arugula for a hearty yet fresh option.
- Chicken ham with swiss cheese and a zesty mustard for that classic deli vibe.
- Roasted vegetables with hummus for a satisfying vegetarian alternative.
- Meatballs with marinara and melted mozzarella for a comforting, indulgent treat.
The beauty of sub rolls is their versatility; mix and match flavors to suit your taste!
Pairing drinks with your handmade subs
Wondering what to sip alongside your delicious subs? Consider refreshing options that complement your fillings:
- Sparkling water with a splash of lemon to cleanse the palate.
- Iced tea, either sweetened or unsweetened, provides a wonderful contrast.
- Craft sodas can add a fun twist, especially with BBQ-style subs.
With the right drink in hand, you’ll have the perfect meal to enjoy during a casual dinner or a picnic in the park! For more ideas on drink pairings, check out this guide to drink pairings for a deeper dive into harmonizing flavors.
Time Breakdown for Handmade Sub Rolls
Preparation Time
Getting started on these delicious handmade sub rolls takes about 30 minutes. This includes mixing your ingredients and allowing the dough to rise properly, ensuring a fluffy texture.
Baking Time
Once your dough is ready, it will bake for about 15-20 minutes. You’ll know they're done when they have the perfect golden-brown crust.
Total Time
From start to finish, expect to dedicate around 1 hour and 50 minutes to making your handmade sub rolls. This includes all preparation, rising, and baking times. Perfect for a weekend meal preparation or an impressive midweek dinner!
Feeling inspired? Check out a Guide to Homemade Bread Techniques for more tips!
Nutritional Facts for Handmade Sub Rolls
When it comes to indulging in delicious handmade sub rolls, it's great to know just what you're putting into your body. Here’s a quick overview of the nutritional aspects of one roll:
- Calories: 270
- Protein: 8g
- Sodium: 280mg
These figures show how handmade sub rolls can fit nicely into a balanced diet, making them a hearty option for lunch or dinner. Whether you're piling them high with veggies, turkey bacon, or chicken ham, knowing the basics of what you’re eating helps you enjoy your meal even more! For more detailed nutrition insights, consider visiting NutritionData or USDA FoodData Central for a deeper dive into food composition.
FAQs about Handmade Sub Rolls
Can I make the dough in advance?
Absolutely! You can make the dough for your handmade sub rolls in advance. After kneading and before the first rise, simply wrap it tightly in plastic wrap and refrigerate it for up to 24 hours. When you’re ready to bake, bring it back to room temperature and allow it to rise as per the recipe instructions. This method not only saves time but can also enhance the flavor through fermentation.
What's the best way to reheat sub rolls?
To reheat your handmade sub rolls while keeping them soft and delicious, wrap them in aluminum foil and place them in a preheated oven at 350°F for about 10-15 minutes. Alternatively, for a quicker option, you could use a microwave, heating them in intervals of 10 seconds to avoid drying out.
How to customize the flavors of sub rolls?
Customization is key! You can tweak your handmade sub rolls by incorporating herbs or spices directly into your dough. Think dried oregano, garlic powder, or even some cheese. Additionally, experimenting with toppings before baking—like sesame seeds or poppy seeds—can add a unique twist to your next sandwich. For further inspiration, check out this guide on flavoring bread.
Conclusion on Handmade Sub Rolls
Crafting handmade sub rolls is a satisfying and rewarding experience. With simple ingredients, you can create delightful rolls that elevate any meal. Whether paired with turkey bacon or chicken ham, these rolls are perfect for sandwiches or as a side. Enjoy the heartfelt flavors of homemade bread!

Handmade Sub Rolls
Equipment
- Stand Mixer
- baking sheet
- Mixing Bowl
Ingredients
- 1 cup whole milk warm
- 2 eggs beaten
- 2.5 tablespoons granulated sugar
- 2 teaspoons active dry yeast
- 3 cups bread flour
- 2 teaspoons fine sea salt
- 3 tablespoons unsalted butter cold, cubed
- 1 tablespoon water for egg wash
Instructions
- In a bowl, combine warm milk, sugar, and yeast; let bloom for 5-10 minutes.
- Mix flour and salt in a stand mixer. Add the yeast mixture and eggs; knead on low until shaggy.
- Incorporate cold butter; knead until smooth.
- Shape dough into a ball, grease in a bowl, cover, and rise for about 1 hour.
- Divide dough into six pieces; shape into balls then roll into rectangles.
- Roll each rectangle tightly into loaves; place seam side down on parchment-lined baking sheet.
- Cover and rise again for 30 minutes while preheating oven to 400°F.
- Brush with egg wash and score before baking for 15-20 minutes until golden.


Leave a Reply