
Introduction to Rosemary and Roasted Garlic Artisan Bread
The joy of homemade bread
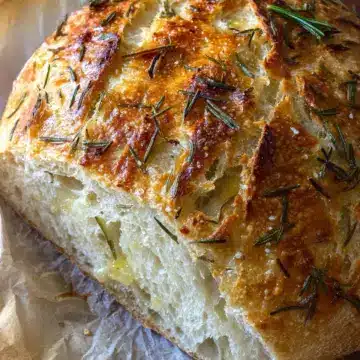
There's something truly magical about the aroma of freshly baked bread wafting through your kitchen. When you embark on making rosemary and roasted garlic artisan bread, you’re not just following a recipe; you’re experiencing a sensory journey that engages all your senses. The crusty exterior and chewy texture combine with the delightful herbal notes of rosemary and the rich, sweet undertones of roasted garlic to create a loaf that’s as delicious as it is satisfying. Plus, the no-knead method means you can spend less time working the dough and more time enjoying the fruits of your labor. For beginners, there are fantastic resources available to help you navigate this culinary adventure.
Why rosemary and garlic make the perfect pairing
Have you ever wondered why rosemary and garlic work so well together? Their flavors complement each other beautifully—rosemary offers earthy, floral notes, while roasted garlic brings a savory depth that elevates any dish. Garlic contains antioxidants and may even support heart health, making your delicious artisan bread a wholesome treat. Whether you're enjoying it with olive oil, as a side to your favorite pasta dish, or simply toasted as a snack, this bread is sure to impress. Plus, this combination is a favorite among foodies, ensuring you'll have a crowd-pleaser on your hands every time you make it!
Ready to dive into the full recipe? Let's get started!
Ingredients for Rosemary and Roasted Garlic Artisan Bread
Essential ingredients for the bread
Creating a delicious rosemary and roasted garlic artisan bread starts with the right ingredients. Here’s what you’ll need:
- Water (1½ cups): Room temperature, ideally around 70°F (21°C).
- Yeast (1 teaspoon): Active dry yeast does the magic here.
- Flour (3 cups): You can use either bread or all-purpose flour for a wonderful texture.
- Dried oregano (½ teaspoon): This adds a subtle floral note.
- Salt (1 teaspoon): Kosher or fine sea salt enhances all the other flavors.
- Fresh rosemary (2 teaspoons): Finely chopped, plus extra for garnishing the top.
- Roasted garlic (1 whole head): This will be the star of the loaf, enriching the flavor profile.
- Extra-virgin olive oil (1 tablespoon): Just a dash to round everything out.
Roasted garlic: the secret ingredient
Don’t underestimate the power of roasted garlic! Not only does it infuse a rich, sweet flavor into your bread, but it also provides numerous health benefits, such as boosting the immune system and promoting heart health. To roast garlic, simply slice a head in half, drizzle with olive oil, and season with salt and pepper before wrapping it in foil and baking at 400ºF (204ºC) for 40 minutes. Once cooled, you'll find the cloves easily pop out, ready to be smashed and mixed into your dough. If you want to learn more about the benefits or uses of garlic, check out resources like Healthline or WebMD.
By gathering these ingredients, you're one step closer to baking a delightful loaf that fills your home with an irresistible aroma!
Step-by-Step Preparation for Rosemary and Roasted Garlic Artisan Bread
Making your own rosemary and roasted garlic artisan bread is not just about the delicious end result, but also the rewarding process. Let’s break down this journey into manageable steps so you can bake a loaf that fills your kitchen with warmth and fragrance.
Prepare the roasted garlic
Roasting garlic transforms its sharp, pungent flavor into something rich and sweet. Simply slice a head of garlic in half, drizzle the exposed cloves with extra-virgin olive oil, and season with coarse sea salt and black pepper. Wrap it in foil and pop it into a 400°F (204°C) oven for about 40 minutes until golden and gooey. Once it cools, squeeze the cloves from their skins and set them aside. This will add a luscious depth to your rosemary and roasted garlic artisan bread.
Mixing the yeast and dough ingredients
While your garlic roasts, it’s a good time to prep the dough. In a large mixing bowl, sprinkle 1 teaspoon of active dry yeast over 1½ cups of room-temperature water and let it rest for 10-15 minutes. Meanwhile, combine 3 cups of flour, ½ teaspoon of dried oregano, 1 teaspoon of kosher salt, and 2 teaspoons of finely chopped rosemary in another bowl. Once the yeast is frothy, mix it with the dry ingredients along with the smashed roasted garlic and 1 tablespoon of olive oil. Stir with a rubber spatula until just combined; it’s okay if the dough looks a little sticky.
Allowing the dough to rise
Cover the mixing bowl with a towel or plastic wrap and set it in a warm spot, away from drafts. The dough needs to rise for about 8-10 hours — this long fermentation is key to developing flavor and texture. You'll know it's ready when it has doubled in size.
Folding the dough and cold proofing
After the dough has risen, it’s time to gently fold it. Flour your work surface and turn the dough out, using floured hands or a dough scraper. Fold it over itself several times to form a smooth ball. Place it seam-side up in a floured bowl, dust it lightly with more flour, cover it, and refrigerate it overnight (or up to 48 hours if needed). This cold proofing really enhances the flavors and makes for a crustier loaf!
Baking in the Dutch oven
When you’re ready to bake your rosemary and roasted garlic artisan bread, preheat your oven to 450°F (232°C) with the Dutch oven inside. Turn the dough onto a floured surface seam-side down, and gently shape it into a loaf. Place it on a piece of parchment paper and score a design on top. Lift the parchment into the preheated Dutch oven, cover, and bake for 30 minutes. Remove the lid and continue baking for another 15 minutes, until it’s golden brown and sounds hollow when tapped. Once done, let it cool on a wire rack for up to an hour before slicing.
With these steps, you'll not only bake a stunning loaf but also enjoy the satisfaction of homemade bread. So, why not gather your ingredients today and embark on this delightful baking adventure?
Variations of Rosemary and Roasted Garlic Artisan Bread
Adding Different Herbs
While the classic combination of rosemary and roasted garlic is a winner, consider branching out! Fresh or dried herbs like thyme, sage, or even oregano can add new dimensions to your artisan bread. Try mixing in chopped fresh basil or dill for a unique twist that complements the savory flavors. Each herb brings its own profile, making your bread versatile and exciting for any meal. What’s your favorite herb to bake with?
Experimenting with Cheese
Incorporating cheese into your rosemary and roasted garlic artisan bread can take it to another level. Adding shredded cheddar or crumbled feta creates delightful flavor bursts in every bite. Don’t shy away from unique choices like goat cheese or smoked gouda for an unexpected twist! Cheese not only enhances flavor but adds richness and texture, making your loaf irresistibly delicious. Which cheese are you most eager to try?
For more herb ideas, check out resources like The Herb Society of America to explore new flavor palettes!
Cooking Tips and Notes for Rosemary and Roasted Garlic Artisan Bread
Mastering the No-Knead Technique
The beauty of rosemary and roasted garlic artisan bread lies in its no-knead approach, which allows for a more relaxed baking experience. Simply combine your ingredients and let time do the work. Avoid the temptation to overmix; the dough should be shaggy and sticky. Using a spatula and folding technique helps develop gluten without traditional kneading. This method also enhances flavor, giving the bread its signature chewiness. Don’t be discouraged if your dough seems loose—that’s perfectly normal!
Storage and Longevity Notes
After you've enjoyed your delicious bread, proper storage is key to keeping it fresh. Store your rosemary and roasted garlic artisan bread on the counter, wrapped in a tea towel, for 2-3 days. For extended freshness, slice and freeze parts you won’t consume immediately; it can last up to 3 months in the freezer. Just remember to toast or thaw it before serving for the best taste. Curious about bread storage techniques? Check out King Arthur Baking for great tips!
Serving Suggestions for Rosemary and Roasted Garlic Artisan Bread
Perfect pairings with meals
There’s something beautifully rustic about slicing into a loaf of rosemary and roasted garlic artisan bread. It pairs wonderfully with a variety of dishes. Consider serving it alongside hearty soups like tomato basil or a rich butternut squash soup. You can also enjoy it with grilled chicken or turkey bacon for a satisfying lunch. A fresh arugula salad with a lemon vinaigrette makes a delightful side, balancing the savory notes of the bread. For an elegant dinner, try it with beef stew or a flavorful ratatouille.
Unique appetizers using the bread
Transform your artisan bread into an appetizer star! Slice a few pieces and toast them lightly. Top with whipped feta and roasted cherry tomatoes for a savory bite, or create mini bruschettas with olive tapenade and fresh basil. Another fun idea is to craft a garlicky crostini by spreading the bread with creamy ricotta and drizzling it with honey. These snacks not only showcase the flavors of the rosemary and roasted garlic artisan bread, but they’re also perfect for entertaining guests or enjoying a cozy night in!
For more inspiration on how to elevate simple ingredients, check out this guide to pairing breads with meals, which dives deeper into food harmonies that can take your dining experience to the next level.
Time Breakdown for Rosemary and Roasted Garlic Artisan Bread
Preparation time
This delightful rosemary and roasted garlic artisan bread requires about 15 minutes of hands-on preparation. It's mostly about combining the ingredients and letting the magic happen as the dough rises.
Rise and proofing time
Patience is key here! The dough requires roughly 8-10 hours to rise and double in size. After that, a cold proof in the refrigerator is up to 48 hours, giving you the flexibility to fit it into your busy schedule.
Baking time
When you’re ready to enjoy your homemade bread, allocate about 45 minutes for the baking process. The perfectly crisp crust and fluffy interior are worth every second!
Total time
In total, you're looking at around 18 hours and 40 minutes from start to finish. It may seem like a long time, but most of that is hands-off—allowing the dough to develop incredible flavors and textures while you go about your day.
For more tips on baking your best bread yet, check out resources from King Arthur Baking and The Perfect Loaf. Happy baking!
Nutritional Facts for Rosemary and Roasted Garlic Artisan Bread
Caloric Breakdown
Enjoying a slice of rosemary and roasted garlic artisan bread is not just a treat for your taste buds, but also provides a satisfying caloric experience. Each serving (approximately one slice) contains around 120-150 calories, making it a delightful addition to any meal without overwhelming your dietary goals.
Key Nutrients
This artisan bread isn't just carbs; it packs a nutritional punch! Here’s what you get in each serving:
- Carbohydrates: Essential for energy, about 25-30g, derived mainly from the flour.
- Protein: Each slice contributes around 4-5g, helping support muscle maintenance.
- Fiber: With dietary fiber content of about 1g, it aids digestion and promotes a feeling of fullness.
- Vitamins and Minerals: The rosemary and garlic add beneficial antioxidants, along with small amounts of calcium, potassium, and magnesium.
For further reading on the benefits of garlic and herbs in your diet, check out resources from Healthline. This bread combines flavor and nutrition, making it perfect for a balanced lifestyle!
FAQs about Rosemary and Roasted Garlic Artisan Bread
How can I tell when the bread is properly baked?
Knowing when your rosemary and roasted garlic artisan bread is perfectly baked can be tricky. Look for a deep golden-brown crust; it should sound hollow when you tap the top. An instant-read thermometer can also help—aim for an internal temperature of about 200°F (93°C). Trust your senses, and don’t hesitate to check!
What if I don’t have a Dutch oven?
No Dutch oven? No problem! Simply preheat a baking sheet alongside your oven, and place a shallow pan with water on the bottom rack to create steam. This steam will help develop a crust similar to what you'd get in a Dutch oven. Your bread may need a little extra time baking, so keep an eye on it.
Can I substitute other flours?
Definitely! While this recipe shines with bread or all-purpose flour, you can experiment with whole wheat or spelt flour as well. However, note that using different flours may slightly alter the texture and rise of your rosemary and roasted garlic artisan bread. Adjust hydration if necessary, and enjoy the creative process!
Conclusion on Rosemary and Roasted Garlic Artisan Bread
Crafting your own rosemary and roasted garlic artisan bread is a rewarding experience that fills your kitchen with warm, inviting aromas. This loaf is not just food; it's a labor of love that transforms simple ingredients into something magical. Enjoy a slice warm or toasted, paired with olive oil or your favorite spread. Happy baking!
Rosemary and Roasted Garlic Artisan Bread
Equipment
- Digital scale
- spatula
- Dough scraper
- 4 Qt mixing bowl
- parchment paper
- 3 Qt Dutch oven
Ingredients
Roasted Garlic
- 1 head garlic
- extra-virgin olive oil
- coarse sea salt
- freshly ground black pepper
Bread
- 1.5 cups water room temperature (at or near 70°F/21°C)
- 1 teaspoon active dry yeast
- 3 cups bread or all-purpose flour plus more for dusting
- 0.5 teaspoon dried oregano
- 1 teaspoon kosher or fine sea salt
- 2 teaspoons finely chopped rosemary plus more to sprinkle across the top
- 1 whole head roasted garlic smashed
- 1 tablespoon extra-virgin olive oil
Instructions
Preparation
- Slice the garlic head in half. Drizzle the exposed cloves with olive oil and season with salt and pepper. Wrap in foil and roast on a baking sheet at 400ºF (204ºC) for 40 minutes. Let cool, remove cloves from their skins and set aside.
- When you're ready to bake, sprinkle the yeast over the water and let it sit for 10-15 minutes. In a large bowl, stir together flour, oregano, salt and rosemary and set aside.
- Add yeast mixture, roasted garlic and olive oil to the bowl then use a rubber spatula to mix it together just until combined. The dough will look a little sticky and stringy and there should still be a little flour around the edges of the bowl.
- Cover and let rise somewhere warm until it has doubled in size, about 8-10 hours.
- Once the dough has doubled in volume, use your hands (or a dough scraper if you have one) to pull the dough out onto a floured surface. With floured hands, gently fold the dough into itself several times until a soft, flour-covered ball is formed. Seam side up, lift and place it into a flour dusted bowl. Dust with flour, cover and refrigerate overnight.
- When you're ready to bake your bread, preheat oven to 450ºF (232ºC) with your Dutch oven inside the oven.
- Uncover then invert the bowl to turn the dough out onto a lightly floured surface seam side down. If needed, gently turn it with your hands and nudge it into the shape of a loaf. Place it on a sheet of parchment paper and score the top with a razor blade or the tip of a sharp knife.
- Once the oven is preheated, remove the Dutch oven from the oven and transfer the dough, still on the parchment, into the Dutch oven. Cover and bake for 30 minutes, then remove the cover and bake for 15 minutes more.
- Using parchment edges, lift bread from Dutch oven and transfer it to a wire cooling rack to let cool for up to an hour before slicing.


Leave a Reply