
Introduction to Pan-Fried Cabbage and Noodle Buns
If you're a young professional constantly on the go, finding time to prepare nourishing meals can be a challenge. Enter pan-fried cabbage and noodle buns—a delicious solution that fits perfectly into a busy lifestyle. These buns are not just a delightful treat; they are a nutritious and filling option, packed with fresh vegetables and hearty noodles. They can easily be made ahead of time, making them ideal for meal prep.
These scrumptious buns combine all-purpose flour, cabbage, and vermicelli noodles, providing a satisfying mix of textures and flavors. Plus, they can be customized with your favorite fillings, making them versatile for different tastes or dietary needs—think using turkey bacon or chicken ham for added protein.
With minimal ingredients and straightforward techniques, making these buns can be an engaging weekend project that pays off during the week. Serve them with a tangy dipping sauce or enjoy them solo; they're sure to become a staple in your culinary repertoire.
If you’re wondering where to find the best ingredients, check out this guide on quality produce. Let’s dive into the recipe for irresistible pan-fried cabbage and noodle buns!
Ingredients for Pan-Fried Cabbage and Noodle Buns
Creating delicious pan-fried cabbage and noodle buns starts with gathering the right ingredients. Here’s what you’ll need:
Dough Components
- 3 cups all-purpose flour (375 g)
- 2 teaspoon instant dry yeast – a must for that delightful fluffiness!
- 2 tablespoon sugar – adding a touch of sweetness
- ½ teaspoon salt – to enhance all the flavors
- 1 tablespoon roasted sesame seeds – these will bring a nutty aroma
Wet Ingredients
- 1 cup warm soy milk or any preferred non-dairy milk
- 1 tablespoon toasted sesame oil or neutral oil, for richness
Flavorful Filling
- 1 tablespoon neutral oil for cooking
- 6 cups raw shredded cabbage (about half a large head)
- 3.5 oz uncooked vermicelli noodles (100g total)
- 1 cup finely shredded or grated carrot (150g)
- ½ cup chopped scallions or chives (25g)
- 1 tablespoon soy sauce – for a savory kick
- 2 teaspoon salt (or to taste)
- 1 tablespoon roasted sesame seeds for garnish
- 2 tablespoon toasted sesame oil
Gather these ingredients, and you’ll be well on your way to making scrumptious pan-fried cabbage and noodle buns. Your taste buds will thank you!
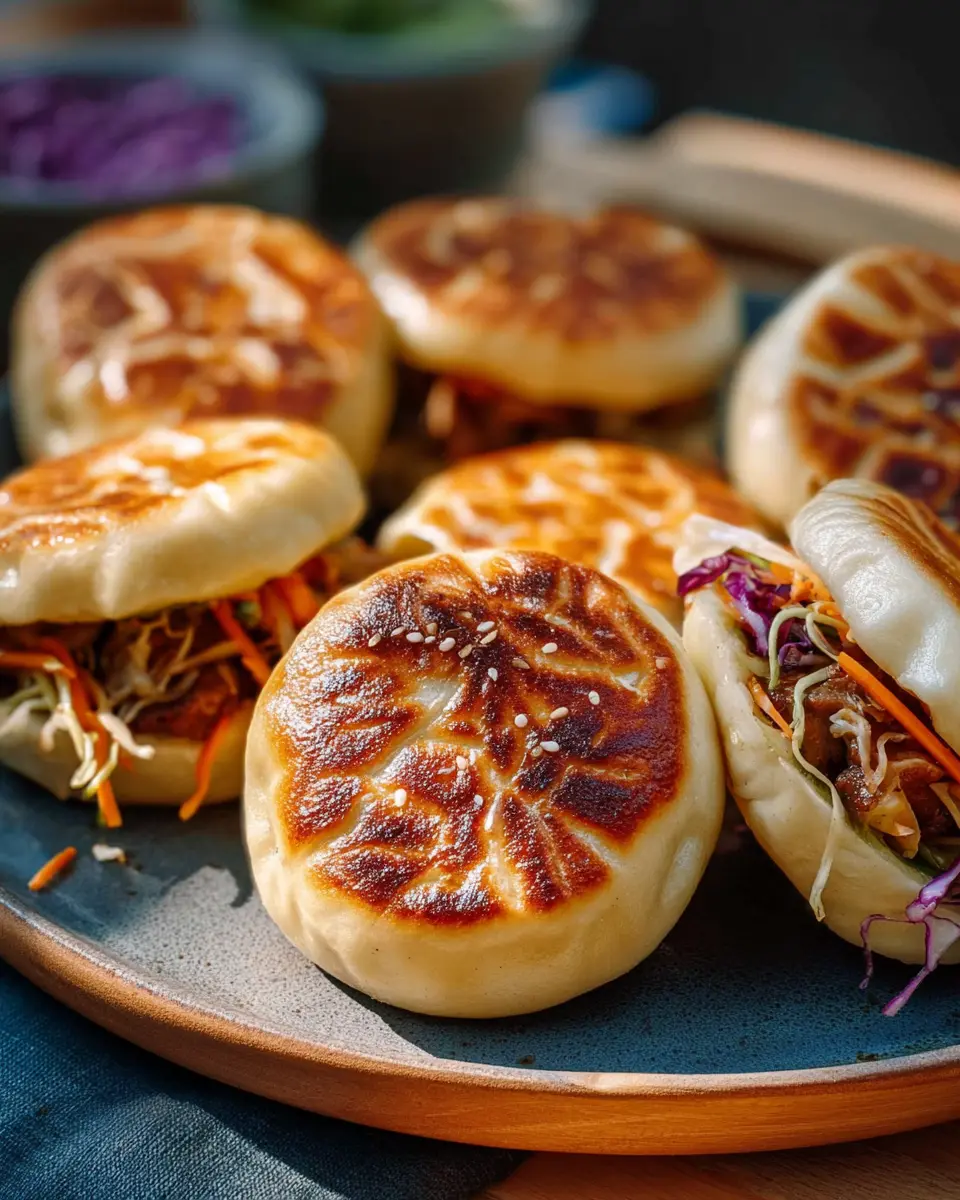
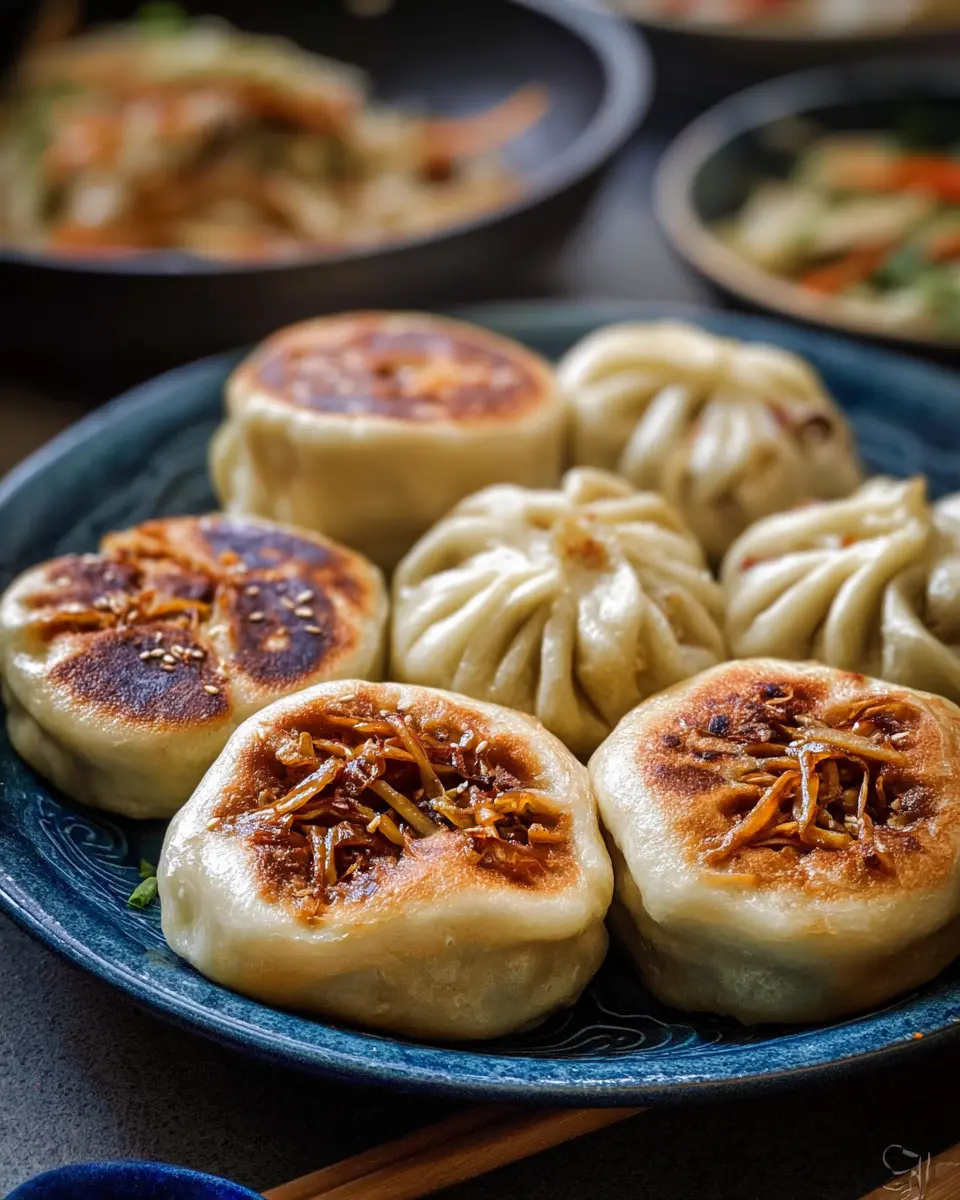
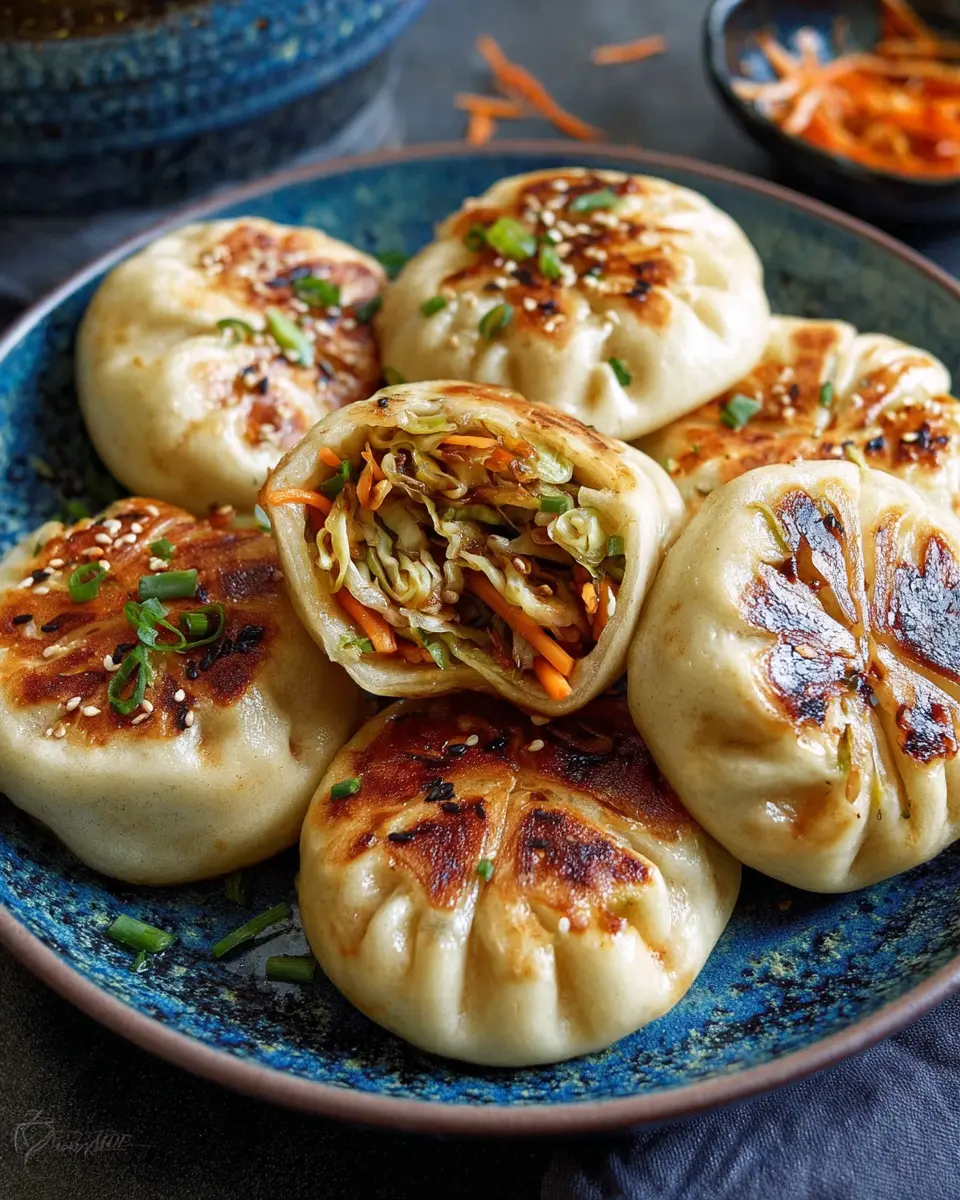
Preparing Pan-Fried Cabbage and Noodle Buns
Making pan-fried cabbage and noodle buns is a fun cooking adventure that yields delicious results! The combination of crispy wrappers and flavorful filling makes for a satisfying meal or snack. Follow these steps to ensure your buns turn out great every time.
Create the Dough
Start by bringing together the dry ingredients in a large bowl. This includes flour, instant dry yeast, sugar, salt, and roasted sesame seeds. Mix these well and create a well in the center. Pour in the warm soy milk (or your preferred non-dairy milk) and toasted sesame oil, and mix everything until a dough forms. Knead the dough lightly, shape it into a ball, and place it in a bowl. Cover it with a damp cloth and let it rest for at least two hours. This is key for a nice rise, so be patient!
Cook the Flavorful Filling
While your dough rises, it’s time to get the filling ready. Soak the uncooked vermicelli noodles in boiling water for about 7-8 minutes until they are tender. Drain and chop them into smaller pieces. Next, heat some neutral oil in a pan and toss in your chopped scallions, carrots, and shredded cabbage. Cook everything over medium-high heat for about 4-5 minutes—you want the veggies to be tender but still vibrant! Add in your drained noodles, soy sauce, salt, and sesame oil, stirring everything to combine well. Cook for an additional 2-3 minutes before transferring the mixture to a strainer to remove excess liquid. Set it aside to cool, and feel free to taste it and adjust the seasoning!
Craft the Wrappers
Once your filling is cool, it’s time to create the wrappers. Punch the risen dough down and stretch it into a large ring. Slice it into 12–16 pieces based on your preferred bun size. Roll each piece into a ball. To make a wrapper, flatten the ball slightly and roll it out to about 3-5 inches in diameter, depending on your bun size. Don’t stress too much about perfection—practice makes perfect! Place the rolled wrappers on a lightly floured tray to prevent sticking.
Assemble the Buns
Now for the fun part—assembling your pan-fried cabbage and noodle buns! Place about 2-3 tablespoons of your cooled filling in the center of each wrapper. Pinching the edges together while making creases helps ensure a good seal. Once sealed, give each bun a gentle press to flatten the top slightly, and place them back on the tray.
Cook to Crisp Perfection
Heat a pan with a lid and add some oil. Carefully arrange your buns, creased side down, in the pan. Cook them for about 4–5 minutes until they’re golden brown. Then, add a splash of water (about 4 tablespoons) into the pan for steaming, cover quickly, and let them cook for an additional 5–6 minutes. This steaming step locks in moisture and flavor!
Once all buns are cooked, they’re ready to enjoy! Pair them with your favorite dipping sauce—a simple mix of soy sauce, sugar, and chili works wonderfully.
And there you have it—a delightful batch of homemade pan-fried cabbage and noodle buns! Enjoy the process and don’t be afraid to share your creations with friends and family. Happy cooking!
Variations on Pan-Fried Cabbage and Noodle Buns
Additions for a Twist
Looking to elevate your pan-fried cabbage and noodle buns? Consider adding different proteins or veggies! A bit of sautéed chicken ham, turkey bacon, or even mushrooms can introduce a savory depth. For a burst of freshness, try incorporating herbs like cilantro or fresh basil. You can also swap out the cabbage for other greens, such as bok choy or spinach, for a delightful twist that keeps things exciting.
Vegan Modifications
If you're looking to keep things plant-based, don’t worry—you can still enjoy these delicious buns! Substitute the soy milk with any non-dairy milk, and opt for a plant-based oil. Feel free to enhance the filling with tofu, tempeh, or additional veggies for that satisfying texture and flavor. A dash of nutritional yeast can also add a cheesy twist without any dairy—perfect for those vegan cravings!
Cooking Tips and Notes for Pan-Fried Cabbage and Noodle Buns
Troubleshooting Common Issues
Sometimes the pan-fried cabbage and noodle buns can be a bit tricky. If the dough feels too sticky, add a sprinkle of flour to make it easier to handle. Conversely, if it’s too dry, a splash of warm soy milk can help. While cooking, ensure the heat is balanced; too high can burn the buns, while too low might leave them soggy.
Flavoring Ideas
Elevate your pan-fried cabbage and noodle buns with exciting flavors! Consider adding diced mushrooms, garlic, or fresh ginger to the filling for an aromatic twist. Fresh herbs like cilantro or basil can give a fresh, bright touch, while a drizzle of chili oil or sesame sauce before serving adds a delightful kick. Don't shy away from experimenting—your taste buds will thank you!
For more tips on enhancing flavors, check out resources like Food52 or Serious Eats.
Serving Suggestions for Pan-Fried Cabbage and Noodle Buns
Dipping Sauces to Complement Your Buns
Enhance the flavor of your pan-fried cabbage and noodle buns with delicious dipping sauces. Try a simple mix of soy sauce, a splash of rice vinegar, and a bit of chili oil for a spicy kick. Alternatively, a soy sauce and sesame oil blend with a sprinkle of sesame seeds adds a rich, nutty touch. Feel free to experiment with your favorite sauces to find the perfect match for your palate!
Side Dishes That Pair Well
For a well-rounded meal, consider serving your pan-fried cabbage and noodle buns alongside crisp cucumber salad or steamed edamame. Both options add a refreshing contrast and complement the savory flavors of your buns. If you’re feeling adventurous, a side of miso soup adds warmth and depth to the table, rounding out your dining experience beautifully. Enjoy!
Time Breakdown for Pan-Fried Cabbage and Noodle Buns
Preparation Time
Get ready to roll! The preparation time for these delicious pan-fried cabbage and noodle buns is about 2.5 hours. This includes making the dough and letting it rise. Don't worry, most of this time is just waiting while you daydream about how amazing these buns will taste!
Cooking Time
Once the dough has risen, you'll spend about 30-45 minutes frying and steaming the buns. It’s quick—and trust me, you’ll be happy to know that the smell of cooking will have everyone gathering in the kitchen!
Total Time
Altogether, you’re looking at a total time of roughly 3-3.5 hours. Perfect for a cozy weekend cooking adventure! Grab some friends or family, and turn this into a fun cooking session where everyone can get involved. Enjoy the outcomes—your pan-fried cabbage and noodle buns will be a hit!
Nutritional Facts for Pan-Fried Cabbage and Noodle Buns
Calories per bun
Each pan-fried cabbage and noodle bun packs approximately 135 calories, making it a satisfying option without excessive caloric intake. Perfect for a light lunch or a snack!
Key nutrients
These buns are not just tasty; they're also nutritious! With 21g of carbohydrates, 3g of protein, and essential vitamins like Vitamin A and C, they contribute to a balanced diet. Ideal for health-conscious foodies!
FAQs about Pan-Fried Cabbage and Noodle Buns
Can I prepare the filling in advance?
Absolutely! You can prepare the filling for your pan-fried cabbage and noodle buns a day in advance. Just store it in an airtight container in the refrigerator. This also allows the flavors to meld beautifully. When you're ready to cook, simply follow the wrapping and frying instructions.
How do I store leftover buns?
To keep your leftover pan-fried cabbage and noodle buns fresh, place them in an airtight container and refrigerate for up to 5 days. When you’re ready to enjoy them again, you can pan-fry with a splash of water, oven-toast, or microwave them with a bit of water for moisture.
What type of cabbage works best?
For the best texture and flavor in your buns, opt for green cabbage or napa cabbage. Both varieties offer a subtle sweetness that complements the noodles. You could also try savoy cabbage if you enjoy a slightly softer, crinkly texture.
Conclusion on Pan-Fried Cabbage and Noodle Buns
In conclusion, pan-fried cabbage and noodle buns offer a delightful blend of flavors and a fun cooking experience. Whether enjoyed fresh or stored for later, these buns are perfect for any meal. Explore your creativity with dipping sauces, and relish every bite! Enjoy your cooking adventure!

Pan-Fried Cabbage and Noodle Buns
Equipment
- large bowl
- Pan
- Strainer
- rolling pin
- tray
Ingredients
Dough
- 3 cups all-purpose flour (375 g)
- 2 teaspoon instant dry yeast (opened pack can be stored in the freezer for future use)
- 2 tablespoon sugar
- ½ teaspoon salt
- 1 tablespoon roasted sesame seeds
- 1 cup warm soy milk or other non-dairy milk
- 1 tablespoon toasted sesame oil or neutral oil
Filling
- 1 tablespoon neutral oil for cooking
- 6 cups raw shredded cabbage from ½ large head of cabbage
- 3.5 oz uncooked bundles of vermicelli noodles (100g total)
- 1 cup finely shredded or grated carrot (150g)
- ½ cup chopped scallions or chives (25g)
- 1 tablespoon soy sauce
- 2 teaspoon salt or to taste
- 1 tablespoon roasted sesame seeds
- 2 tablespoon toasted sesame oil
Instructions
Preparing the Dough
- In a large bowl, mix together all dry ingredients. Create a well in the center and then pour in the warm milk and oil while mixing. Keep mixing until a dough is formed.
- Shape the dough into a ball, then place it in a bowl. Cover it with a damp towel and let it rest for at least 2 hours to let the dough rise.
Cooking the Filling
- Soak dry vermicelli noodles in boiling hot water for 7-8 minutes or until cooked. Drain excess water. Roughly chop the noodles into small ½ inch long pieces.
- Heat a pan. Add in 1 tablespoon neutral oil. When the oil is hot, add in the chives, carrots, and cabbage. Cook over medium high heat for 4-5 minutes until the carrots are tender. Add in noodles. Pour in the soy sauce, salt, and oil.
- Mix well with a wooden spoon or spatula and cook for another 2-3 minutes over medium heat. Adjust seasoning based on desired taste.
- Transfer to a strainer to drain excess liquid from the vegetables then set aside to cool while you prepare the wrappers.
Preparing the Wrappers
- Take the dough out of the bowl then stretch into a large ring. I do this by first punching a hold in the centre of the ball of dough.
- Slice the dough into 12 or 16 pieces. Each piece will be around 50g if you divide them into 12. Each ball of dough will be around 38g if you divide them into 16 pieces.
- Roll or shape each piece of dough into a ball.
- To make a wrapper, press down on the ball of dough and lightly flatten it over the surface. Sprinkle a little flour on top and lightly coat your rolling pin with some flour as well. While holding both ends of the rolling pin, roll out the dough by moving the pin forward and backward.
- Rotate the dough 90 degrees and repeat the movement. Continue to roll out the dough until you have a wrapper that’s around 3-4 inches in diameter (for 38g wrapper) and around 4-5 inches (for 50g wrapper). If you can’t make them into a perfectly round shape, that’s okay!
- Place the rolled out wrappers on a tray, spaced from one another or if stacking, be sure to brush each layer with some flour to prevent from sticking. Limit each stack to 4-5 wrappers (do not stack them too high), and cover with a DRY towel to prevent them from drying out.
Making the Buns
- Take a rolled out piece of wrapper and place around 2-3 tablespoon of filling into the center. With one hand, crease the edges of the wrapper while you pinch down the creases with the other hand.
- Once you have gone around the edges of the wrapper, pinch and then twist to seal the buns.
- Place the bun on a flat surface and lightly press down the top.
- Afterwards, place back the bun on the tray and cover with a towel to prevent it from drying out.
- Repeat for the rest of the wrappers.
Cooking the Buns
- Heat a pan with a lid, add in 1 tablespoon of oil (for every 4 buns). When hot, add in the buns (creased-side first) and lightly press down. Leave to cook over medium heat for 4-5 minutes until it has a golden brown crust.
- Prepare the lid of your pan. Using the lid as protection, carefully pour 4 tablespoon of water (1 tablespoon for each bun) into the pan and then immediately cover to prevent it from splashing due to the heat.
- Leave to cook in the steam until the water has evaporated, around 5-6 minutes. Take out the buns and repeat this step for the remaining ones.
- Enjoy while hot! You can enjoy these with a dipping sauce if you’d like!
Storing and Freezing the Cooked Buns
- Place the cooked buns in an air-tight container and refrigerate for up to 5 days. To reheat, you can pan fry them again with a splash of water or oven-toast in low heat. You can also microwave the buns in a bowl with a splash of water.
- You can freeze the cooked buns too and just reheat in the pan, oven toaster, or steam them before enjoying! No need to thaw.


Leave a Reply