
Introduction to Key Lime Pie in a Jar Recipe
The Appeal of Dessert in a Jar
There's something undeniably charming about dessert in a jar. It brings a playful twist to traditional recipes, like our delicious key lime pie in a jar recipe. Each jar offers a perfect portion, making it an ideal treat for gatherings or a simple indulgence at home. Imagine impressing your friends with these delightful layers—it's as much about the presentation as it is about the taste!
Plus, who wouldn’t love that nostalgia of enjoying your favorite dessert without the fuss of slicing and serving? The individual servings make it easy to grab and go, whether you’re heading to a picnic or just enjoying a cozy night in. Not to mention, the jars are great for meal prep or gifting—fill them up with layered goodness, and you have a sweet surprise for someone special!
And let's not overlook the refreshing flavor of key lime pie. The zesty lime, creamy filling, and crumbly crust come together to create a symphony of textures and flavors. If you’re eager to dive into a culinary adventure, grab your jars and let’s get started on this irresistible dessert! You'll love how simple it is to whip up this show-stopping treat.
Ingredients for Key Lime Pie in a Jar Recipe
Creating a delightful key lime pie in a jar recipe is all about balancing textures and flavors. Let’s break down the key components that make this dessert a hit!
Crust Layer
For that classic, buttery graham cracker crust, gather the following:
- 1 cup graham cracker crumbs (about 18 crackers)
- 3 tablespoons granulated sugar
- Pinch of salt
- 3 tablespoons unsalted butter (melted)
This crumbly crust provides a lovely crunch and is easily assembled. For added texture, you might consider using a food processor for finer crumbs.
Key Lime Pie Layer
The zesty, creamy filling is what truly shines:
- 1 (14-ounce can) sweetened condensed milk
- 2 teaspoons fresh lime zest
- ½ cup lime juice*
- 3 egg yolks
The key here is fresh lime juice; it elevates the flavor significantly. Imagine that vibrant citrus taste—delicious!
Topping
Finish it off with:
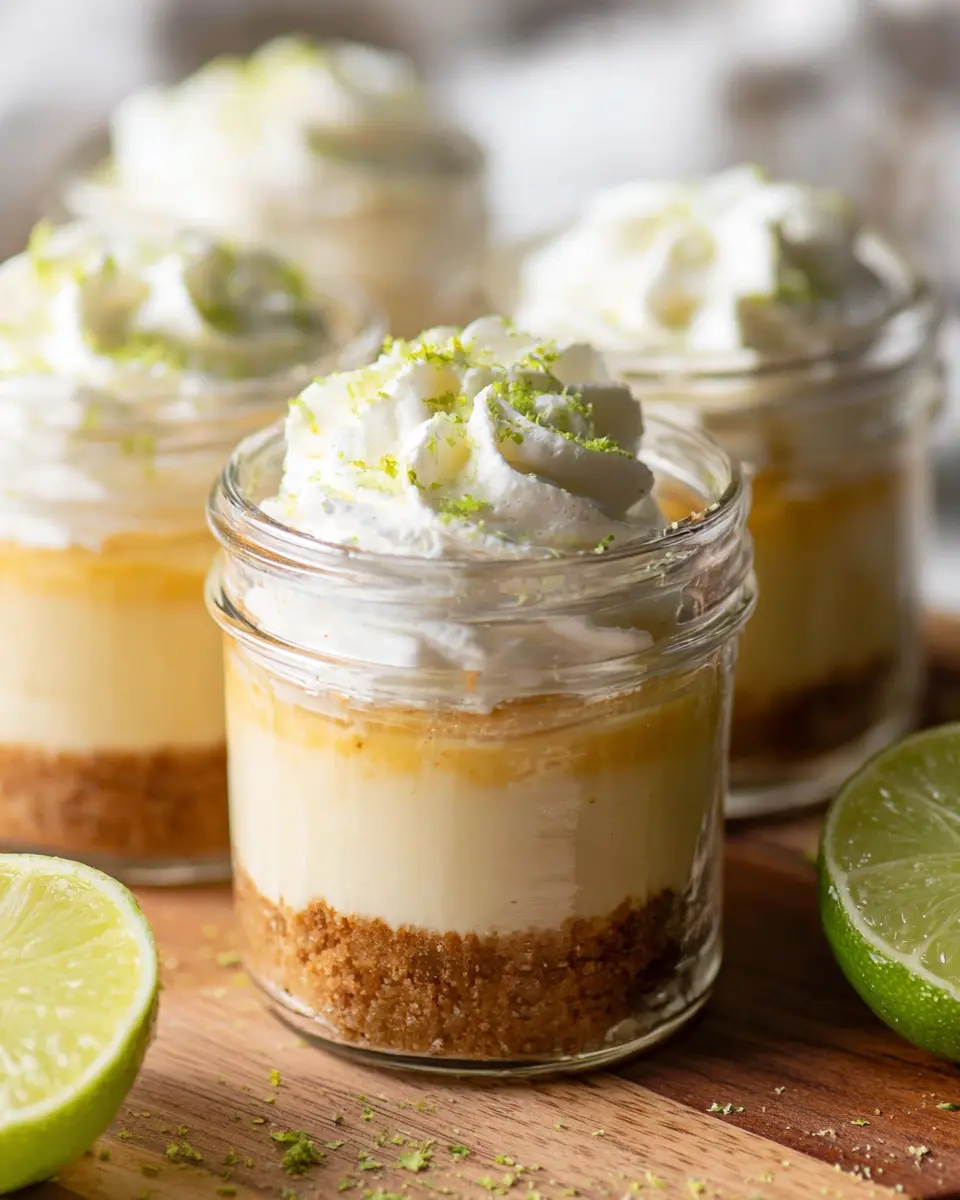
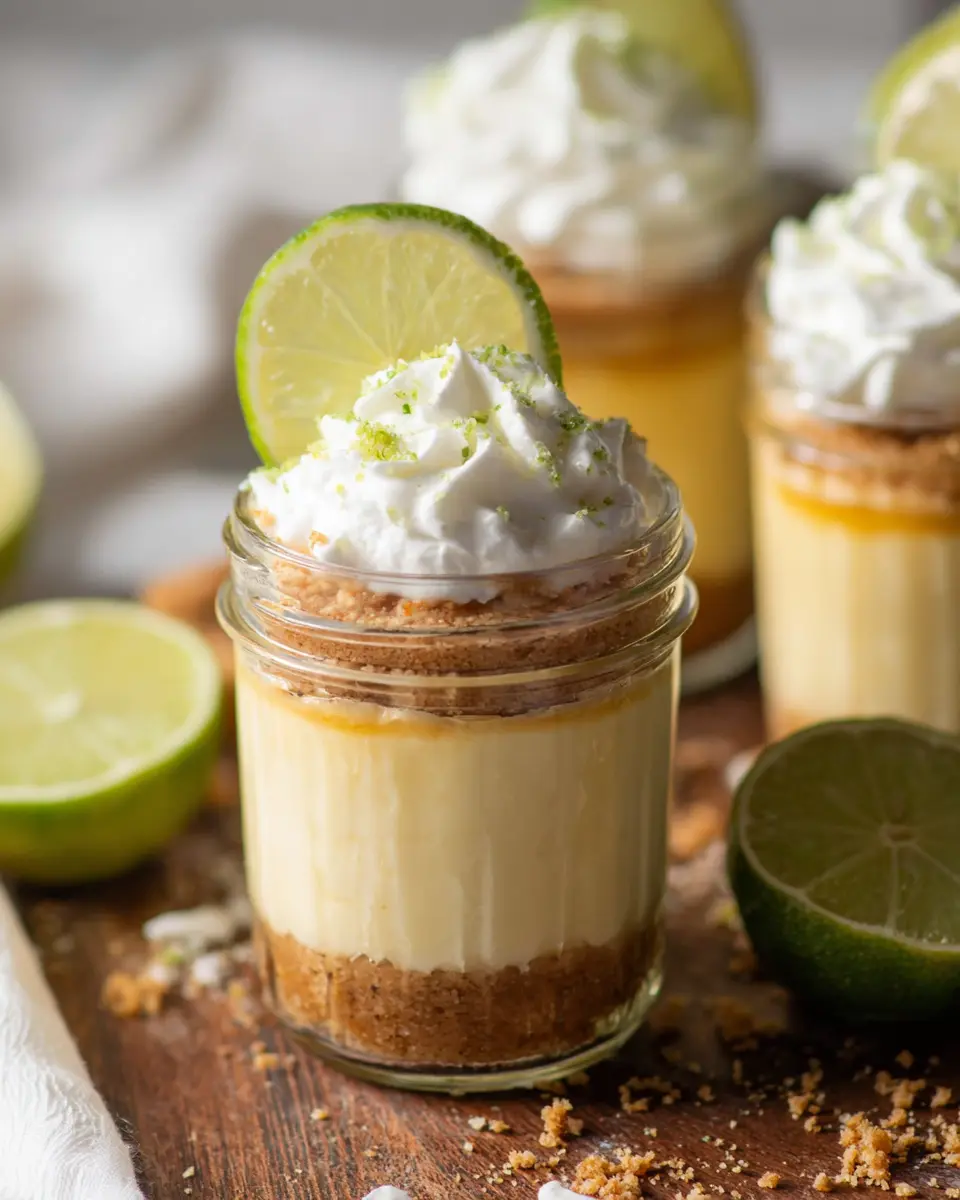
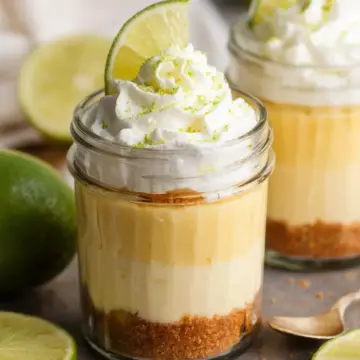
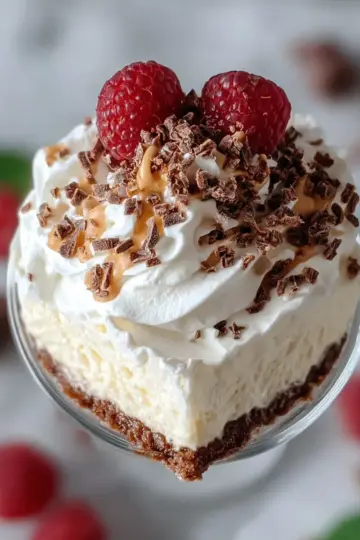
- Whipped cream
- Lime wedges for garnish
A dollop of whipped cream adds a dreamy touch, while lime wedges not only look elegant but also enhance the pie's citrusy punch.
So grab your jars, and let's whip up this key lime pie in a jar recipe! Happy baking!
Step-by-step preparation of Key Lime Pie in a Jar
Preheat the oven
To start this delightful key lime pie in a jar recipe, first things first—set your oven to 350 degrees Fahrenheit. This ensures a perfect bake for your pie filling. While the oven warms up, get out your 8-ounce mason jars and arrange them on a rimmed baking sheet. This setup will not only help manage any potential spills but also make transferring them in and out of the oven super easy.
Prepare the graham cracker crust
The crust is the foundation of any great pie, and this one is no exception. Grab a Ziploc bag and toss in your graham crackers. Take a rolling pin and smash the crackers until they're a fine crumb. In a medium bowl, combine your crushed graham crackers with 3 tablespoons of granulated sugar and a pinch of salt. Mix it well! Pour in your 3 tablespoons of melted unsalted butter and stir until the crumbs are evenly coated. This step is crucial—too compacted and you’ll end up with a dense crust. You want a light, crumbly texture that comes together when pressed slightly into the jars.
Mix the key lime pie filling
Now, let’s whip up that delicious filling. Using a microplane zester, zest one of the limes into a medium bowl. You want about 2 teaspoons of lime zest for that fresh flavor. Add in 1 can of sweetened condensed milk, ½ cup of fresh lime juice (this is where that iconic tang comes from), and 3 egg yolks. Whisk this mixture thoroughly until everything is fully incorporated. The lime juice will react with the eggs and create a wonderfully creamy concoction perfect for your jars.
Assemble the jars
Now comes the fun part: assembling your jars! Take your prepared graham cracker crust and spoon an even layer into each of the jars. Don’t press too hard—just a gentle nudge to prevent it from sticking. Next, pour the key lime filling evenly over the crust in each jar. Aim for about two-thirds full, leaving room for topping later.
Bake the filled jars
Pop the baking sheet with jars into your preheated oven. Bake until the filling is set and no longer jiggles—this should take about 15 minutes. The smell of those key limes baking will surely make your kitchen feel like a tropical paradise!
Cool and chill before serving
Once baked, let the jars cool at room temperature for about 30 minutes. After they’ve cooled, cover each jar with its lid and refrigerate for at least two hours. This step is key for letting all the flavors meld together. When you’re ready to serve, top each jar with a generous dollop of whipped cream and a lime wedge for that extra touch.
And there you have it—a playful twist on a classic dessert that’s perfect for sharing or enjoying all by yourself!
Variations on Key Lime Pie in a Jar
Adding Fruit Toppings
One delightful way to elevate your key lime pie in a jar recipe is with fresh fruit toppings. Consider adding sliced strawberries, blueberries, or even tropical fruits like mango. A handful of these vibrant fruits not only adds color but also a burst of flavor that contrasts beautifully with the tartness of the key lime filling. You could also drizzle a bit of passion fruit puree for an exotic twist!
Switching Up the Crust
If you’re looking to switch things up, try different crust alternatives. Crushed vanilla wafers or even chocolate cookies can bring a whole new dimension to your dessert. For a gluten-free option, use ground almonds or gluten-free graham cracker crumbs. These variations create distinct flavors and textures, allowing you to customize your key lime pie in a jar to your personal taste!
Cooking Tips and Notes for Key Lime Pie in a Jar
Common Mistakes to Avoid
When making this key lime pie in a jar recipe, a couple of common pitfalls can impact your results. First, don’t overpack the graham cracker crust—lightly pressing the crumbs allows for a more pliable layer that’s easy to scoop. Also, ensure your filling ingredients are at room temperature; this helps them combine smoothly and leads to a creamy texture.
Ingredient Quality Matters
Using high-quality ingredients can elevate your dessert significantly. Opt for fresh limes instead of bottled lime juice for a brighter flavor, and choose a reputable brand of sweetened condensed milk for the best sweetness. It’s these small details that truly make a difference in your key lime pie experience—trust me, your friends will notice!

Serving suggestions for Key Lime Pie in a Jar
Creative serving ideas
Elevate your Key Lime Pie in a Jar recipe with these fun twists! Consider layering some fresh berries, like strawberries or blueberries, on top of the cream for a burst of color and flavor. You could also sprinkle crushed graham crackers or even a sprinkle of coconut for extra texture. For an adult twist, add a few drops of coconut or vanilla extract to the whipped cream before topping. Serve the jars on a charming wooden platter, or arrange them in a picnic basket for a lovely presentation.
Ideal occasions for serving
These jars are perfect for a variety of occasions. Whether you're hosting a casual dinner party, celebrating a birthday, or even enjoying a sunny picnic in the park, Key Lime Pie in a Jar will impress your guests. They also make delightful treats for a summer BBQ or a tropical-themed gathering. If you're looking for a refreshing touch after a hearty meal, these jars are the ideal sweet finish. You might even consider them as a unique gift for someone special—just tie a ribbon around the jar for an elegant touch.
Time breakdown for Key Lime Pie in a Jar
Preparation time
Getting started on your key lime pie in a jar recipe doesn't take long! You'll spend about 15 minutes mixing up the graham cracker crust and the zesty key lime filling.
Baking time
Once everything's assembled, you’ll bake the jars for about 15 minutes. It's a quick bake that locks in all those tangy flavors!
Total time
In total, your key lime pie in a jar project will take roughly 45 minutes, including cooling and chilling time before you can dive in and enjoy your delicious dessert. Perfect for a last-minute treat that’s sure to impress!
Nutritional Facts for Key Lime Pie in a Jar
Calories per serving
Each serving of this delightful Key Lime Pie in a Jar comes in at about 350 calories. Perfect for a treat without going overboard!
Key nutrients
This dessert packs a nutritious punch with:
- Calcium: Thanks to the sweetened condensed milk, which supports healthy bones.
- Vitamin C: From the fresh lime juice, it boosts immunity and adds a refreshing zing.
- Healthy fats: Coming from the melted butter in the crust.
Dietary considerations
When enjoying this Key Lime Pie in a Jar Recipe, keep in mind:
- Gluten: For a gluten-free option, swap out the graham cracker crumbs for a gluten-free alternative.
- Dairy: If you’re lactose intolerant, consider using a dairy-free condensed milk substitute.
- Added sugars: The dessert contains sweetened condensed milk and sugar, so keep portions in check if you're watching your sugar intake.
This delicious treat allows you to indulge while making mindful choices!
FAQs about Key Lime Pie in a Jar
Can I make this dessert ahead of time?
Absolutely! This key lime pie in a jar recipe is perfect for prepping in advance. You can assemble the jars and bake them a day ahead of when you plan to serve. They can be stored in the fridge for up to 3 days, allowing the flavors to meld beautifully. Just add the whipped cream topping right before serving for that fresh touch.
What can I use instead of key limes?
If you can't find key limes, don't worry! Regular Persian limes are a great substitute. While the flavor will be slightly different, it will still yield a delicious pie. For a unique twist, you could even try using blood oranges for a citrus spin that’s sure to impress guests.
How should I store leftover key lime pie in a jar?
To keep your dessert fresh, simply cover the jars with their lids and store them in the refrigerator. They'll stay tasty for about 3-5 days. Make sure to reserve any whipped cream to add separately when you're ready to indulge again!
Conclusion on Key Lime Pie in a Jar Recipe
In summary, this key lime pie in a jar recipe offers a delightful twist on a classic dessert, perfect for any gathering or a cozy night in. Its layered textures and zesty flavors make each bite a treat. Don’t forget to have fun with the toppings, from whipped cream to fresh fruit! Enjoy your delicious creation!
Key Lime Pie in a Jar Recipe
Equipment
- 8 ounce mason jars
- baking sheet
- Microplane Zester
Ingredients
Crust layer
- 1 cup graham cracker crumbs 18 crackers, or ⅔ of a sleeve
- 3 tablespoons granulated sugar
- salt Pinch
- 3 tablespoons unsalted butter melted
Key lime pie layer
- 1 14-ounce can sweetened condensed milk
- 2 teaspoons fresh lime zest
- ½ cup lime juice
- 3 egg yolks
Topping
- whipped cream
- lime wedges for garnish
Instructions
Preparation
- Preheat oven to 350 degrees Fahrenheit. Set jars onto a rimmed baking sheet.
- Place graham crackers in a Ziploc bag and smash to crumbs with a rolling pin. Add the crumbs to a medium bowl along with the sugar and pinch of salt. Stir with a fork until incorporated.
- Drizzle melted butter into the crumb and sugar mixture and continue stirring until incorporated.
- Spoon the graham cracker crumb mixture into each of the four jars, dividing it evenly among the jars. Press very slightly into the bottom and up the sides, but don't compact the crumbs.
- Use a microplane zester to zest one of the limes. Add the zest, along with the sweetened condensed milk, lime juice, and egg yolks, to a medium bowl. Stir with a whisk until well-combined.
- Divide the mixture evenly between the jars.
- Bake until the filling no longer jiggles and is set, about 15 minutes.
- Let jars cool at room temperature for about 30 minutes, then cover with mason jar lids and bands and refrigerate for at least two hours.
- To serve, top with whipped cream and a lime slice.
Leave a Reply