
Introduction to Lemon Thumbprint Cookies
Why you’ll love lemon thumbprint cookies
If you're looking for a delightful treat that combines zesty flavor with a melt-in-your-mouth texture, look no further than lemon thumbprint cookies! These charming little cookies not only stand out with their unique thumbprint shape but also shine with the bright taste of fresh lemons. Imagine biting into a soft, buttery cookie that’s filled with luscious lemon curd—now that’s something to enjoy.
What makes these cookies truly irresistible is the contrast between the sweet sugar coating and the tangy lemon filling. They're perfect for any occasion, whether it’s a sunny afternoon tea or a cozy get-together with friends. Plus, they're easy to make and can be prepared ahead of time, allowing you to focus on enjoying the moment.
Many baking enthusiasts have found success with these cookies, contributing to their popularity—check out this guide on measuring baking ingredients to ensure perfect results every time! And if you're new to lemon curd, don't worry; making it from scratch can be a fun adventure, as outlined in this homemade lemon curd tutorial. Let’s get ready to bake up some scrumptious lemon thumbprint cookies!
Ingredients for Lemon Thumbprint Cookies
Creating the perfect batch of lemon thumbprint cookies begins with gathering the right ingredients. Let’s break it down!
Essential Ingredients for the Dough
To get that sweet and buttery base, you’ll need:
- All-purpose flour: 2 and ¼ cups (281g), properly measured for the best texture.
- Cornstarch: Just 1 tablespoon (8g) helps to keep the cookies tender.
- Salt: A pinch (¼ teaspoon) enhances the overall flavor.
- Unsalted butter: 14 tablespoons (200g), softened to room temperature for easy mixing.
- Granulated sugar: ¾ cup (150g) to sweeten up the mix.
- Fresh lemon zest and juice: 1 tablespoon each, for that delightful citrus zing.
- Egg: 1 large, at room temperature for better blending.
- Vanilla bean paste: 1 teaspoon for depth of flavor.
Coating and Filling Essentials
Once your cookie dough is ready, you'll want to coat and fill them with:
- Granulated sugar: ½ cup (100g) to roll your cookie balls in, adding sweetness and texture.
- Lemon curd: ½ cup (140g), either homemade or store-bought, to fill those delicious thumbprints.
Icing Ingredients
To create that perfect finishing touch, gather:
- Confectioners’ sugar: 1 cup (120g) for the icing.
- Fresh lemon juice: 2 tablespoons (30ml) to drizzle on top for a zesty kick.
With these simple yet essential ingredients, you’re just a few steps away from enjoying your delightful lemon thumbprint cookies! For tips on selecting fresh lemons, check out this helpful resource.
Step-by-step Preparation for Lemon Thumbprint Cookies
Creating your own delicious lemon thumbprint cookies is not just a baking task; it's an experience filled with delightful scents and flavors that will brighten your day. Let’s break down the process step-by-step to make it as easy and enjoyable as possible!
Making the dough
Start by gathering your ingredients and mixing the dry ones first. In a medium bowl, whisk together 2 and ¼ cups of all-purpose flour, 1 tablespoon of cornstarch, and ¼ teaspoon of salt until well combined. Set this bowl aside.
In a larger bowl, grab either a handheld mixer or a stand mixer fitted with a paddle attachment. Beat 14 tablespoons of softened unsalted butter with ¾ cup of granulated sugar at medium-high speed for about 3 minutes, or until it’s nicely creamed. This is a crucial step, so if you're unsure, refer to this helpful guide on creaming butter and sugar.
Once creamed, add the lemon zest, lemon juice, 1 large egg, and 1 teaspoon of vanilla bean paste. Beat again until it's all mixed in smoothly.
Chilling the dough
Now comes the important part—cover the dough with plastic wrap and toss it in the refrigerator. Chilling the dough for at least 3 hours (up to 3 days if you want to plan ahead), helps it firm up, ensuring your cookies keep their shape while baking.
Shaping and coating the cookies
When you’re ready to shape your cookies, preheat your oven to 350°F (177°C). Line your baking sheet with parchment paper or silicone mats—you’ll want them ready to go!
Scoop about 1 tablespoon of chilled dough and roll it into a ball. Next, roll each ball in granulated sugar to give it that sweet coating. Place them about two inches apart on your prepared baking sheets.
Filling the cookies with lemon curd
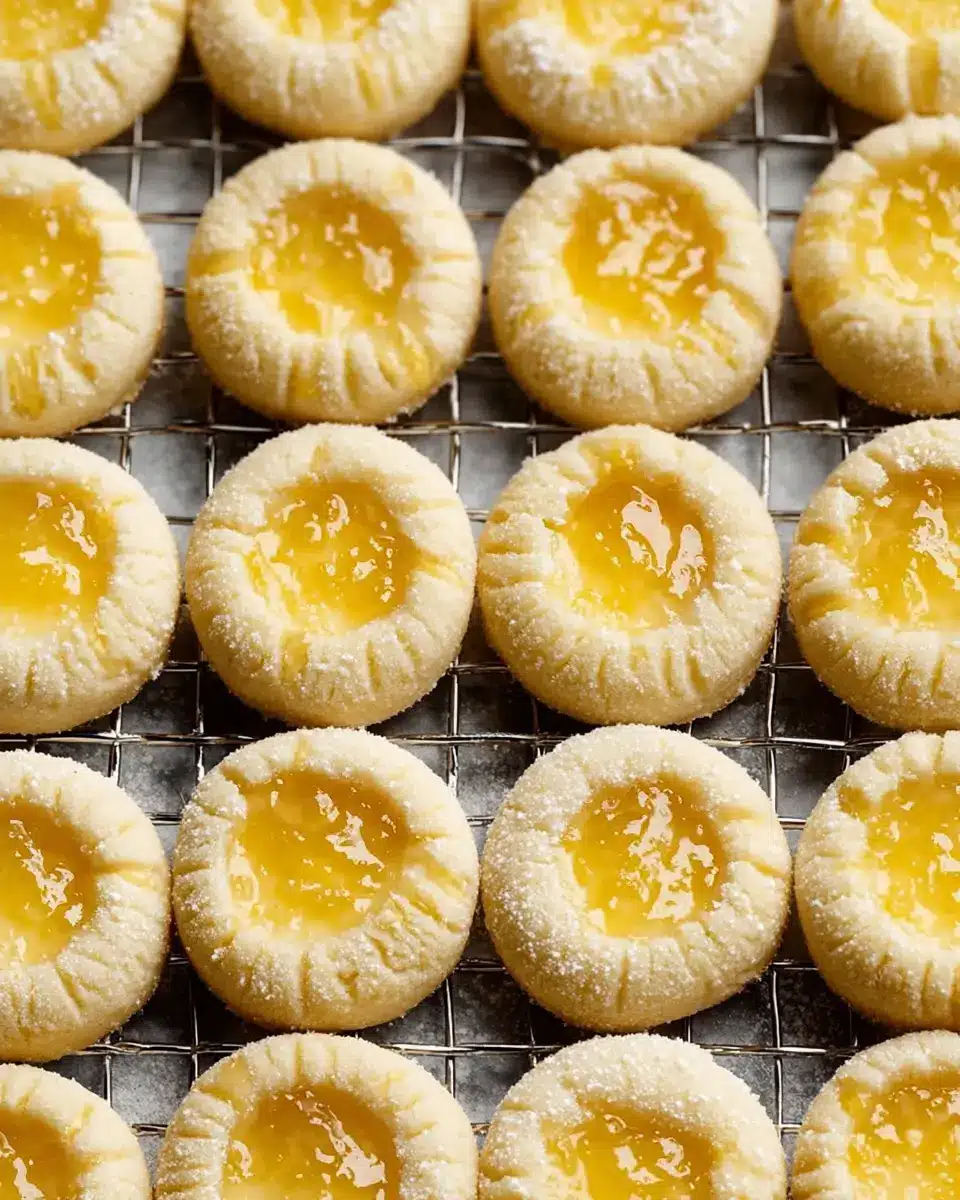
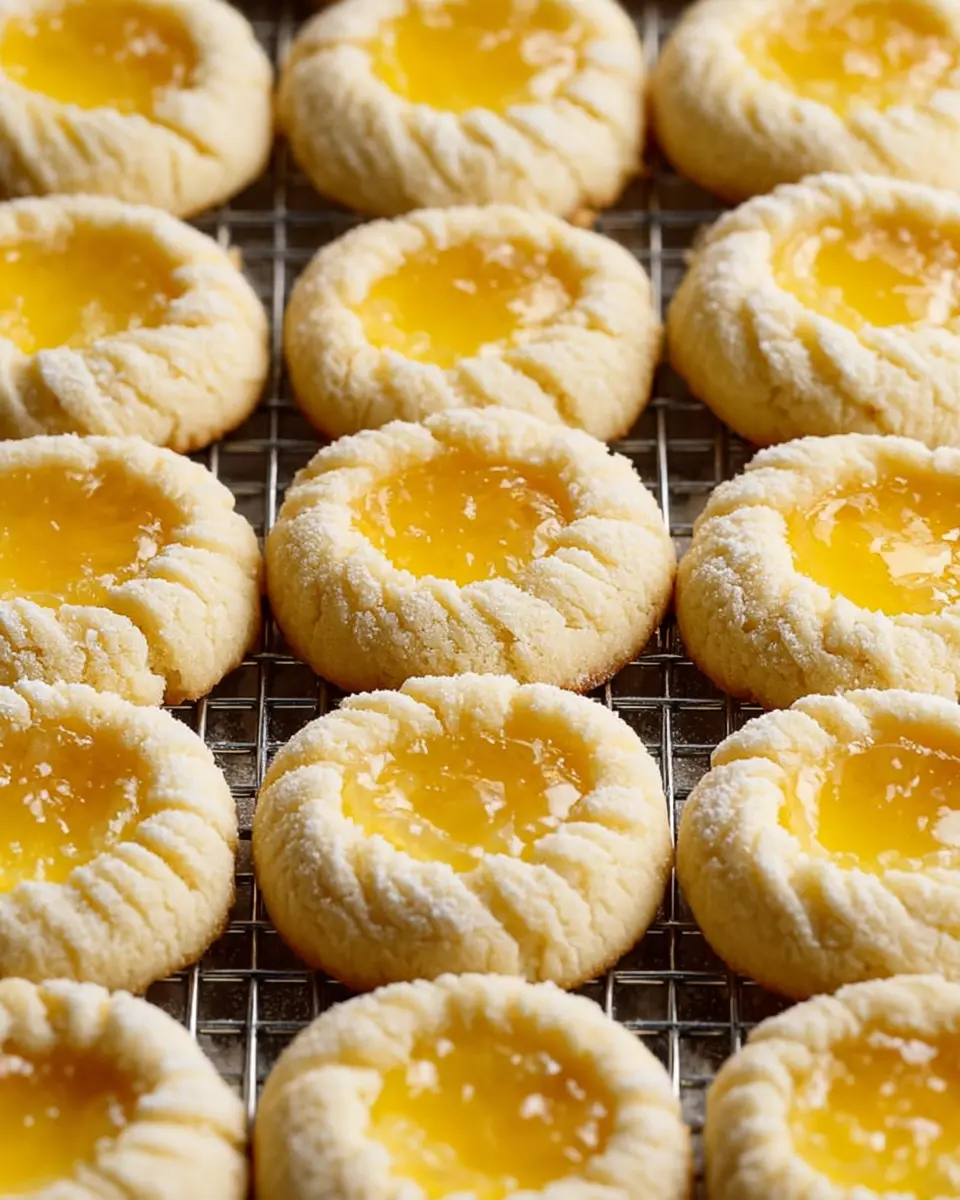
Here’s the fun part! Use your thumb (or the end of a wooden spoon) to create a little indentation in the center of each cookie. Fill each thumbprint with about ½ teaspoon of lemon curd; this will add a burst of citrusy goodness that complements the buttery dough beautifully.
Baking the cookies to perfection
Pop the baking sheets into the preheated oven and bake for 12–13 minutes. You’re looking for the edges to be set with a lightly browned hue. Once done, let the cookies cool on the baking sheet for 5 minutes before transferring them to a wire rack to cool completely.
Icing the cookies
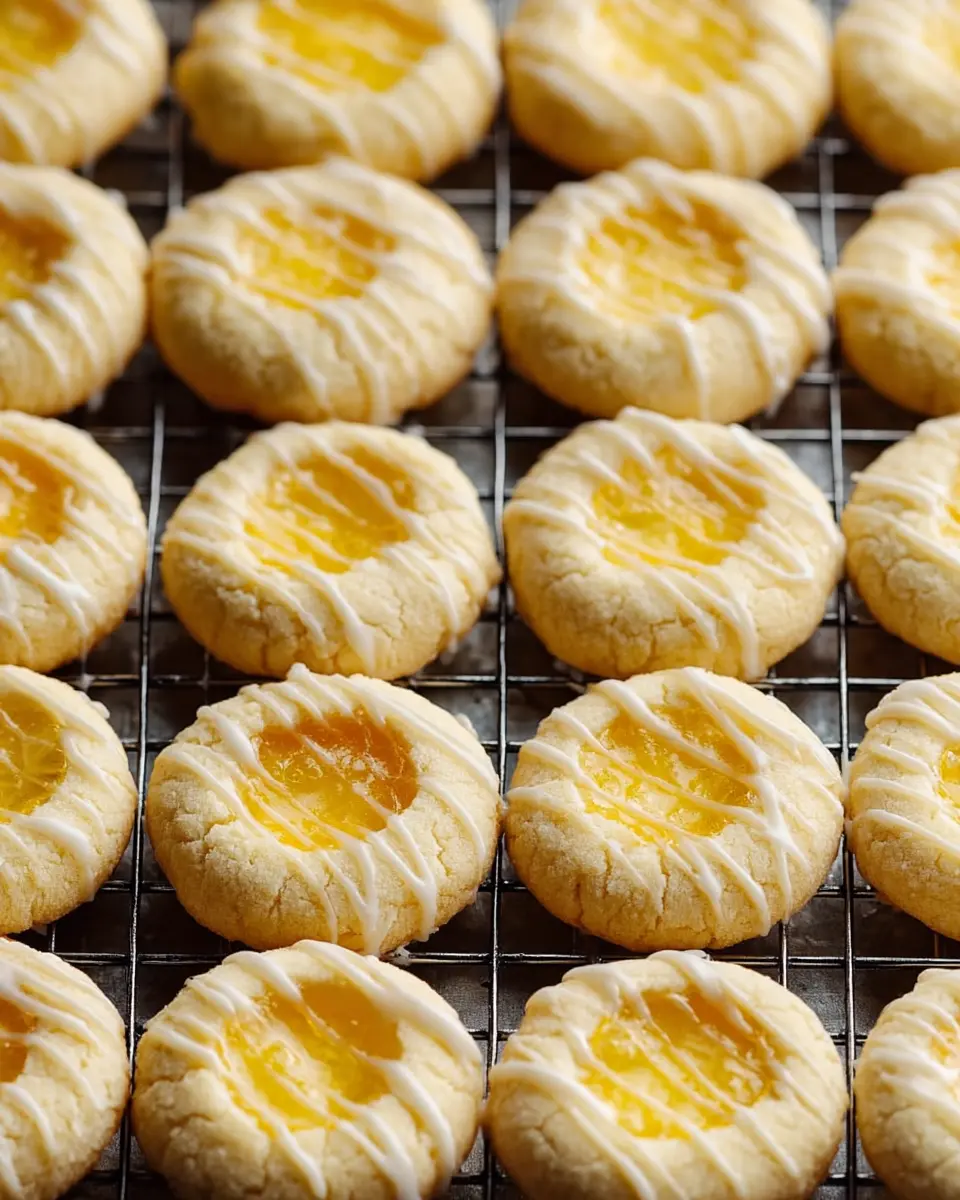
As the cookies cool, why not whip up a simple icing? In a small bowl, mix 1 cup of confectioners' sugar with 2 tablespoons of fresh lemon juice until it’s smooth. Drizzle over the cookies once they’ve cooled, and let them sit for about 30 minutes to set. Now, they’re ready to be served or even gifted!
With these steps, you’ll have a batch of lemon thumbprint cookies that are not only visually stunning but also bursting with flavor. Happy baking!
Variations on Lemon Thumbprint Cookies
Lemon Thumbprint Cookies with Berry Curd
Elevate your lemon thumbprint cookies by swapping out the classic lemon curd for a vibrant berry curd! Raspberry, blueberry, or strawberry curd not only adds a splash of color but also brings a delightful fruity twist that complements the tangy lemon flavor. To create your berry curd, simply substitute fresh or frozen berries in your favorite curd recipe. It’s a fun and creative way to experiment with flavors while keeping the buttery, tender texture intact!
Gluten-Free Lemon Thumbprint Cookies
No need to miss out on these delicious treats if you’re gluten-sensitive! Transform your lemon thumbprint cookies into a gluten-free delight by replacing all-purpose flour with a quality gluten-free flour blend. Be sure to check that your baking powder is also gluten-free. These variations maintain the snack appeal while accommodating dietary preferences! With just a little adjustment, you can enjoy the same melt-in-your-mouth goodness without compromise.
Remember, experimenting in the kitchen can lead to delightful surprises, so don’t hesitate to explore these variations!
Cooking Tips and Notes for Lemon Thumbprint Cookies
Tips for the Perfect Dough Consistency
To achieve the ideal texture for your lemon thumbprint cookies, the dough should be creamy and slightly sticky. This is vital for getting those lovely cookie shapes. Make sure to measure your flour correctly—spoon it into your measuring cup and level it off for accuracy. If the dough feels too wet after mixing, simply add a tablespoon of flour at a time until it reaches the right consistency.
Best Practices for Chilling
Chilling the dough is crucial for controlling spread during baking. Aim for a minimum of 3 hours in the fridge, but if you can, overnight is even better! While chilling, consider placing the baking sheets filled with shaped cookies back in the fridge as your oven preheats; this helps maintain their beautiful shape. Chilling not only helps with shaping but also intensifies the lemony flavor—don’t skip this step for optimal results!
Serving Suggestions for Lemon Thumbprint Cookies
How to Serve and Present Your Cookies
Presentation is key when showcasing your delightful lemon thumbprint cookies. Consider arranging them on a decorative plate or in a clear glass cookie jar for an inviting display. To add a personal touch, include a sprig of fresh mint or rosemary. You can even dust them lightly with powdered sugar right before serving for an extra touch of elegance.
Pairing Ideas with Beverages
For a delightful taste experience, serve your lemon thumbprint cookies with complementary beverages. Here are some ideas:
- Herbal Tea: A warm chamomile or lemon ginger tea can enhance the citrus flavor.
- Coffee: A light roast or a vanilla latte works wonderfully to balance the cookie's sweetness.
- Lemonade: Why not stick with the theme? A fresh lemonade can be a refreshing pairing that highlights that zesty lemon flavor.
These pairings not only elevate your dessert but also create a charming experience for friends and family!
Time Details for Making Lemon Thumbprint Cookies
Preparation Time
Get started with a breezy 20 minutes for mixing and shaping your dough. It's a quick process that sets the tone for delightful lemon thumbprint cookies!
Chilling Time
Patience pays off here—let your dough chill for at least 3 hours. This step is crucial for achieving that perfect texture.
Baking Time
Your cookies will only need about 12-13 minutes in a preheated oven. Just enough time for them to become golden at the edges and soft in the center.
Total Time
All in, you’re looking at around 3 hours and 35 minutes before you can indulge in these zesty treats! Remember, a little waiting goes a long way in cookie perfection.
By managing your time skillfully, each stage of this lemon thumbprint cookies recipe becomes an enjoyable part of the baking process. Happy baking!
Nutritional Facts for Lemon Thumbprint Cookies
Calories per cookie
Each delightful lemon thumbprint cookie contains approximately 120 calories. This makes them a sweet treat you can enjoy without the guilt on special occasions or as an everyday snack.
Sugar content
With about 8 grams of sugar per cookie, these treats provide just the right amount of sweetness to satisfy your cravings without overwhelming your palate.
Fat content
At approximately 6 grams of fat per cookie, the buttery goodness is balanced by a zesty twist from fresh lemon juice and zest, making for a deliciously indulgent yet balanced snack option.
For more about better-for-you baking alternatives, check out our guide on reducing sugar in recipes.
FAQs About Lemon Thumbprint Cookies
Can I use store-bought lemon curd?
Absolutely! Using store-bought lemon curd can save you time and still provide delicious flavor in your lemon thumbprint cookies. Just make sure to choose a high-quality brand for the best results. You can also add a touch of fresh lemon juice for an extra zing.
How can I store leftover cookies?
To keep your lemon thumbprint cookies fresh, store them in an airtight container at room temperature for up to a week. If you want to make them last longer, you can freeze them. Just pop them in a freezer-safe bag, and they’ll stay delicious for up to three months. Thaw them at room temperature before serving.
What can I substitute for all-purpose flour?
If you’re looking for a gluten-free option, try substituting all-purpose flour with a 1:1 gluten-free baking blend. Alternatively, you can explore almond flour for a nutty flavor or even oat flour for a slightly earthy taste. Just be mindful that the texture may vary a bit!
A Sweet Ending on Your Baking Adventure
Lemon thumbprint cookies are more than just a treat; they embody the perfect balance of tangy and sweet. Whether you bake them for a special occasion or simply to brighten your day, these cookies are sure to delight. Enjoy the process, share with friends, and make memorable moments with every bite!

Lemon Thumbprint Cookies
Equipment
- Mixing bowls
- Stand Mixer
- baking sheets
- parchment paper
- wire rack
Ingredients
Dough
- 2.25 cups all-purpose flour spooned and leveled
- 1 tablespoon cornstarch
- 0.25 teaspoon salt
- 14 tablespoons unsalted butter softened to room temperature
- 0.75 cup granulated sugar
- 1 tablespoon fresh lemon zest
- 1 tablespoon fresh lemon juice
- 1 large egg at room temperature
- 1 teaspoon vanilla bean paste or vanilla extract
Coating & Filling
- 0.5 cup granulated sugar
- 0.5 cup lemon curd homemade or store-bought
Icing
- 1 cup confectioners’ sugar
- 2 tablespoons fresh lemon juice
Instructions
Make the Dough
- In a medium bowl, whisk together the flour, cornstarch, and salt until combined. Set aside.
- In a large bowl using a handheld or a stand mixer fitted with a paddle attachment, beat the butter and ¾ cup (150g) granulated sugar together on medium-high speed until creamed, about 3 minutes.
- Add the lemon zest, lemon juice, egg, and vanilla bean paste and beat on high speed until combined, about 1 minute.
- Add the dry ingredients to the wet ingredients and mix on low speed until combined. Cover and refrigerate for at least 3 hours.
Shape & Bake
- Line large baking sheets with parchment paper. Shape dough into balls, roll in granulated sugar, and place on baking sheets.
- Use your thumb to make an indentation in the center of each cookie dough ball. Fill each with ½ teaspoon of lemon curd.
- Preheat oven to 350°F (177°C) and bake cookies for 12–13 minutes.
- Allow cookies to cool on the baking sheet for 5 minutes, then transfer to a wire rack.
Make the Icing
- In a small bowl, whisk together confectioners’ sugar and lemon juice. Drizzle over cooled cookies.


Leave a Reply