
Introduction to Jiffy Corn Casserole
When it comes to quick and comforting meals, Jiffy Corn Casserole is a true game changer for young professionals navigating their busy lives. In just about an hour, you can whip up a delicious, crowd-pleasing dish that effortlessly feeds a small gathering or provides leftovers for the week. Plus, with minimal prep time and a simple list of ingredients, it's an ideal choice for anyone looking to streamline their cooking routine without sacrificing flavor.
What makes this dish so appealing? For starters, it requires less than ten ingredients, many of which you likely already have in your kitchen. The combination of sweet corn and creamy sour cream creates a delightful textural contrast, while the Jiffy mix acts as the magical ingredient that binds it all together.
Whether you're hosting friends for a game night or simply looking for a hearty side for your weeknight dinner, Jiffy Corn Casserole rises to the occasion. In fact, its versatility allows you to customize the dish with protein additions like turkey bacon or chicken ham, adapting it to fit your dietary preferences. Discover how the right recipe can make your culinary adventures enjoyable and stress-free, and check out some cooking tips and tricks from expert chefs online for even more inspiration!
Ingredients for Jiffy Corn Casserole
When cooking up a delicious Jiffy Corn Casserole, having the right ingredients is essential. Not only do they come together to create a delightful dish, but they also elevate your meals with flavor and comfort.
Essential ingredients
To whip up this easy casserole, gather the following key ingredients:
- Unsalted butter: 8 tablespoons (1 stick)
- Corn kernels: 1 (15-ounce) can
- Sour cream: 8 ounces (1 cup) for creaminess
- Large eggs: 2 for binding
- Creamed corn: 1 (15-ounce) can for extra corn flavor
- Jiffy corn muffin mix: 1 (8.5-ounce) box, the star of the dish!
These simple ingredients combine effortlessly, resulting in a comforting casserole perfect for weeknight dinners or potluck gatherings.
Cooking spray or butter
Before you start mixing, prepare your baking dish! Grease an 8x8-inch or 2-quart dish with some cooking spray or butter to prevent sticking. This step is crucial for ensuring that your beautifully baked Jiffy Corn Casserole doesn't cling to the sides, making serving a breeze.
Having these components ready will help you create a dish that your friends and family will love, making cooking feel effortless and fun. For more delicious recipes using corn, check out this source.
Preparing Jiffy Corn Casserole
Making the ultimate Jiffy Corn Casserole is a breeze with just a few simple steps. Whether it's for a family dinner or a potluck, this dish consistently wins hearts (and stomachs). Let’s break it down!
Preheat your oven
First things first, you'll want to set the stage by preheating your oven to 350°F (175°C). This simple step helps the casserole cook evenly, ensuring that it's perfectly puffed and slightly crispy on top when it’s done. While your oven warms up, you can also take the time to prepare your baking dish. An 8x8-inch dish works well, so spray it with cooking spray or rub it with butter to prevent sticking.
Melt the butter
Next, it’s time for the butter. Grab 8 tablespoons (1 stick) of unsalted butter and melt it. You can do this in the microwave; just make sure it’s in a microwave-safe bowl. If you prefer the stovetop, melt the butter in a small saucepan and then transfer it to your mixing bowl. Allow the butter to cool slightly until it's warm to the touch—this keeps the butter from cooking the eggs when you mix them in later.
Mixing the base
Now for the fun part: mixing your ingredients! Into the warm butter, add 8 ounces of sour cream and 2 large eggs. Whisk these together until the mixture is smooth and creamy. This will serve as the delicious base for your Jiffy Corn Casserole. The sour cream adds a rich tang, while the eggs provide structure, so make sure to mix thoroughly. For more inspiration on the importance of balance in your dishes, check out this culinary resource.
Adding in the corn and Jiffy mix
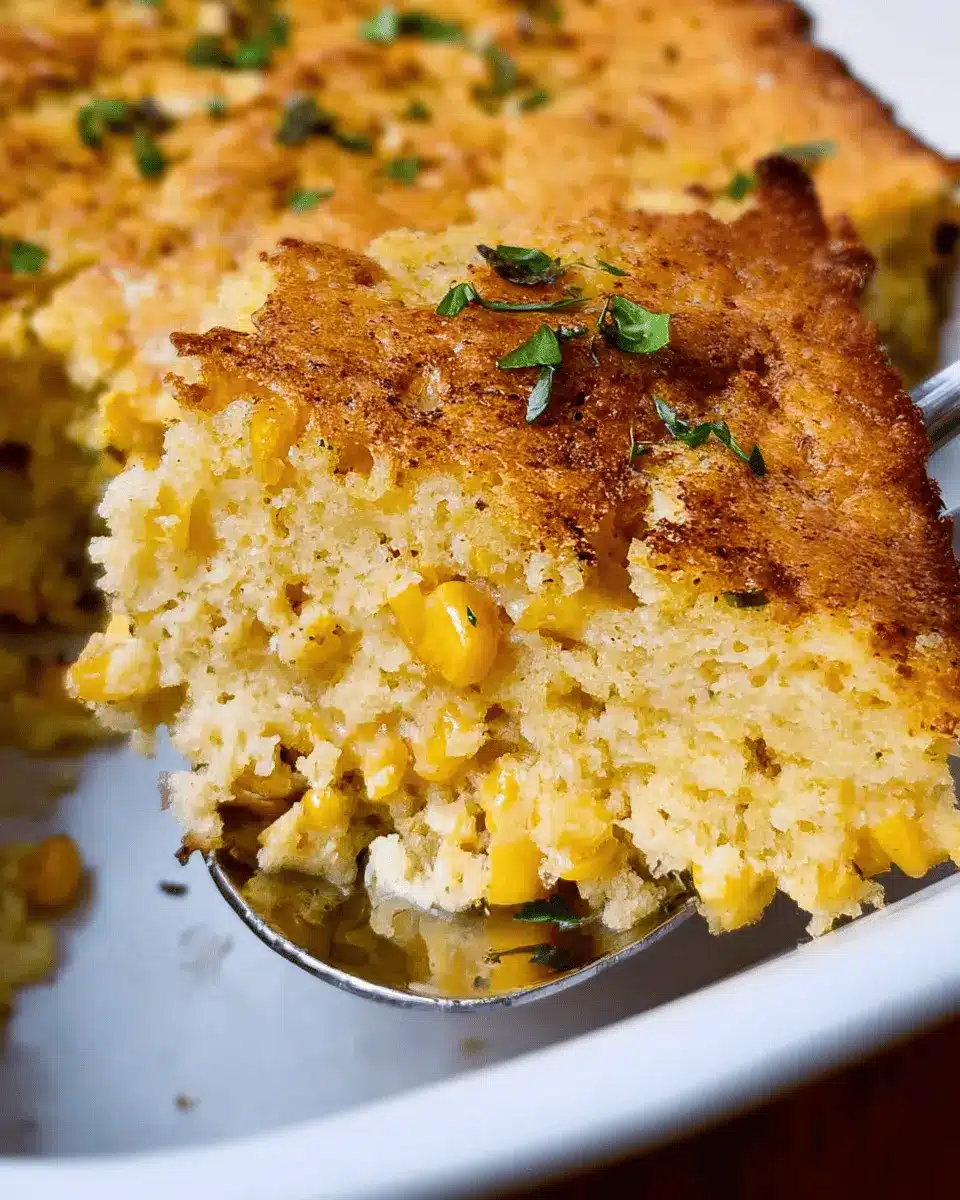
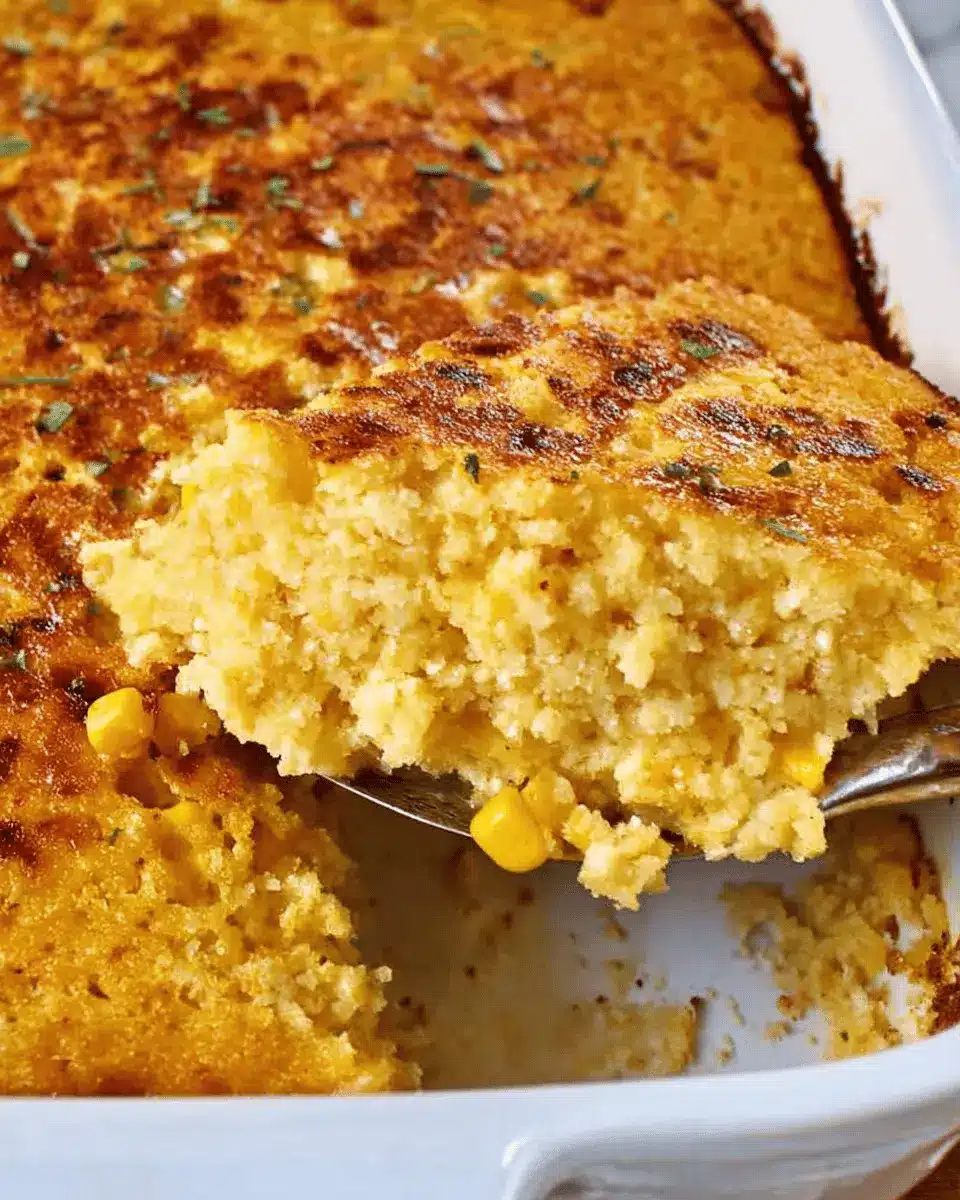
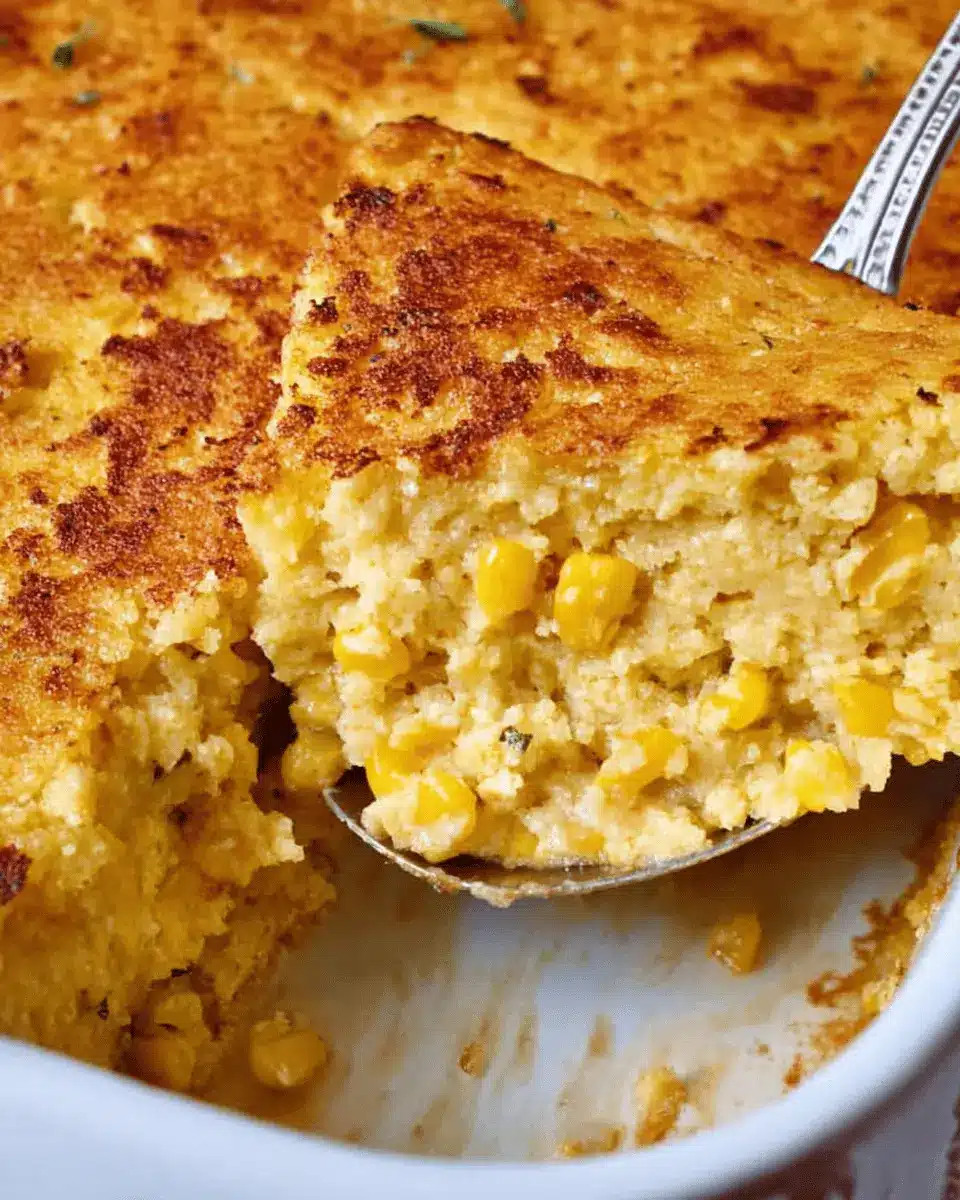
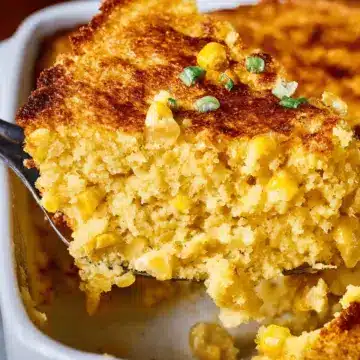
Here comes the star of the show! To your base, add the drained 15-ounce can of corn kernels along with the 15-ounce can of creamed corn. These two types of corn create a delightful texture and enhance the flavor of the dish. Finally, fold in the 8.5-ounce box of Jiffy corn muffin mix until everything is well combined. Be careful not to overmix; you want a nice, airy consistency.
Baking to perfection
Pour your mixture into the prepared baking dish and smooth the top with a spatula. Slide it into your preheated oven, and let it bake for about 45 to 50 minutes. You’ll know it’s ready when the casserole is puffed, slightly browned, and the center is firm. Once out of the oven, allow it to cool for about 10 minutes before serving. This not only makes it easier to slice but also allows those delightful flavors to meld even further.
Now, enjoy your homemade Jiffy Corn Casserole! It's a dish that's always a hit, perfect as a side or a main, and is sure to impress. Happy cooking!
Variations on Jiffy Corn Casserole
Add-ins for a personal touch
One of the best parts about making Jiffy Corn Casserole is that you can easily customize it to your taste. Consider adding mix-ins like diced chicken ham, Turkey bacon, or even fresh herbs such as cilantro for a burst of flavor. You could incorporate jalapeños for a spicy kick or cheddar cheese for that extra gooey goodness. The possibilities are endless! Not sure what to add? Check out this guide on flavor pairings to inspire your culinary creativity.
Vegetarian twists
If you’re looking for vegetarian options, you can swap out any meat additions and replace them with vegetables like bell peppers, zucchini, or spinach. Using plant-based cream or yogurt as a substitute for sour cream maintains that creamy texture without the dairy. Want to elevate your casserole even more? A sprinkle of nutritional yeast can add a cheesy flavor without using cheese. Explore these vegetarian recipes to see other unique flavors that could complement your Jiffy Corn Casserole perfectly!
Cooking Tips and Notes for Jiffy Corn Casserole
Ensure Perfect Texture
For a delightful Jiffy Corn Casserole with a perfect blend of creaminess and fluffiness, make sure to properly mix your ingredients. Avoid overmixing the batter; just combine until everything is incorporated to maintain that lovely texture. Also, letting the casserole sit at room temperature for about 10 minutes after baking allows it to set, making it easier to slice and serve.
Making It Ahead of Time
Want to save time before a gathering? You can prepare the Jiffy Corn Casserole a couple of days in advance. Just mix everything as directed, pour it into your baking dish, cover tightly, and refrigerate. When you're ready to bake, simply pop it in the oven! This dish also reheats beautifully, making it a fantastic option for leftovers. Just place it in a 300°F oven for about 10 to 15 minutes until warmed through.
For more tips on meal prep, check out The Kitchn.
Serving suggestions for Jiffy Corn Casserole
Pairing with Main Dishes
When it comes to enjoying your Jiffy Corn Casserole, you’ll find it pairs wonderfully with a variety of main dishes. Think classic comfort foods like beef meatloaf or chicken ham that's oven-roasted to perfection. The creamy texture of the casserole complements the savory notes of these proteins beautifully. For a lighter option, serve it alongside herb-grilled chicken or a crisp garden salad dressed with vinaigrette. The sweetness of the corn casserole creates a delightful contrast that’ll leave your taste buds singing.
Perfect for Potlucks
If you're invited to a potluck or gathering, don’t hesitate to bring your Jiffy Corn Casserole. This dish is not just crowd-pleasing but also incredibly easy to transport. It’s a sure hit with both friends and families, making it a fantastic addition to any potluck table. You could even serve it with a side of Turkey bacon crumbles for an extra touch that adds flavor and texture. Not only will you score points for home-cooked goodness, but you’ll also spark conversations about your favorite recipes—like this delightful casserole!
For more ideas on side dishes, check out this guide on potluck pairings to elevate your next gathering!
Time Breakdown for Jiffy Corn Casserole
Preparation Time
To kick off your culinary adventure, set aside 5 to 10 minutes for preparation. This is the time you’ll need to gather your ingredients, melt that butter, and mix everything together. Quick and efficient, just like your favorite recipes!
Cooking Time
Next comes the real magic in the oven! The cooking time for this Jiffy Corn Casserole is about 45 to 50 minutes. While it bakes, you can make yourself a cup of coffee or tidy up the kitchen – multitasking at its finest!
Total Time
In total, you’re looking at about an hour for this delightful dish. From start to finish, in just an hour, you’ll have a scrumptious casserole that’s perfect for gatherings or a cozy evening in.
Ready to dig in? This simple breakdown helps you plan your meal effectively, ensuring you're never left wondering when dinner will be served. Happy cooking! If you're curious about more ideas for side dishes, check out this helpful guide on Cooking Light.
Nutritional Facts for Jiffy Corn Casserole
When you're ready to dig into that delicious Jiffy Corn Casserole, it's good to know what you're getting in terms of nutrition. Here are the key facts per serving to keep you informed.
Calories per Serving
Each serving of this comforting casserole contains approximately 250 calories. It's a satisfying dish that pairs wonderfully with your favorite proteins or can be enjoyed on its own!
Protein Content
You'll find about 5 grams of protein in each serving. While it may not be a protein powerhouse, it complements other sources, making it a nutritious addition to your meal.
Sodium Levels
Keep in mind that this Jiffy Corn Casserole has a sodium level of around 500 milligrams per serving. While this can be managed within a balanced diet, those watching their sodium intake should adjust accordingly.
For more detailed dietary guidelines, consider checking out resources like the USDA FoodData Central for tailored nutritional information. Enjoy your delicious creation!
FAQs about Jiffy Corn Casserole
Can I use frozen corn instead of canned?
Absolutely! Frozen corn is a fantastic substitute for canned corn in your Jiffy Corn Casserole. Just make sure to thaw and drain it beforehand to avoid excess moisture, which can make the casserole too soggy. Using frozen corn can also enhance the flavor and texture, providing that fresh, sweet taste we all love.
How can I make it gluten-free?
To make your Jiffy Corn Casserole gluten-free, simply replace the regular Jiffy corn muffin mix with a certified gluten-free version. There are several great options on the market that maintain the same texture and flavor. Always check labels to ensure all other ingredients are gluten-free too, especially the baking powder and any additional mix-ins.
What are the best ways to store leftovers?
If you have any leftovers from your delightful Jiffy Corn Casserole, store them in an airtight container in the refrigerator. They'll stay fresh for about four days. For longer storage, you can freeze portions of the casserole. Just make sure to cool it completely before transferring it to freezer-safe containers. When you're ready to enjoy it again, simply reheat in the oven at 300°F until warmed through. For more tips on food storage, check out resources from the USDA for safety guidelines.
Conclusion on Jiffy Corn Casserole
In a busy lifestyle, homemade meals like Jiffy Corn Casserole provide comfort and nourishment without demanding too much time. This simple recipe allows you to savor the joy of cooking and share delicious moments with loved ones. Try it out—your taste buds will thank you!
The Appeal of Homemade Meals in a Busy Lifestyle
With modern life's fast pace, preparing homemade meals can feel like a daunting task. However, incorporating easy recipes, such as Jiffy Corn Casserole, can make all the difference. Not only does it bring a sense of accomplishment, but it also fosters meaningful connections around the dinner table.
Research shows that home-cooked meals can lead to healthier eating habits and can even save money in the long run. According to a study from the U.S. Department of Agriculture, individuals who cook at home tend to consume more fruits, vegetables, and whole grains while reducing their intake of processed foods. This is especially key for busy young professionals striving for a balanced lifestyle.
But let's be honest—it's not just about health. There's something heartwarming about the aroma of a casserole baking in the oven, creating a cozy atmosphere wherever you are. And who can resist the gooey goodness of a warm, cheesy casserole on a chilly evening? By preparing meals like the Jiffy Corn Casserole, you not only nourish your body but also create those cherished memories that make life more enjoyable.
Embrace the simplicity of this easy-to-follow recipe and let your kitchen become a gathering place for friends and family. For more ideas on making quick and tasty dishes, check out resources from The Kitchn or BBC Good Food.
Jiffy Corn Casserole
Equipment
- oven
- Baking Dish
- microwave
- Mixing Bowl
Ingredients
Base
- 1 stick unsalted butter melted
- 1 15-ounce can corn kernels drained
- 8 ounces sour cream 1 cup
- 2 large eggs
- 1 15-ounce can creamed corn
- 1 8.5-ounce box Jiffy corn muffin mix
Coating
- cooking spray or butter for the baking dish
Instructions
Preparation
- Arrange a rack in the middle of the oven and heat the oven to 350°F. Coat an 8x8-inch or other 2-quart baking dish with cooking spray.
- Melt 8 tablespoons unsalted butter in the microwave in a large microwave-safe bowl. Set aside until warm to the touch. Meanwhile, drain 1 (15-ounce) can corn kernels.
- Add 8 ounces sour cream and 2 large eggs to the butter and whisk to combine. Add the corn kernels and 1 (15-ounce) can creamed corn and stir to combine. Add Jiffy mix and stir until well combined. Pour into the baking dish and smooth the top.
- Bake until the casserole is puffed, slightly browned, and the center is firm, 45 to 50 minutes. Let cool for 10 minutes before serving.


Leave a Reply